
Author’s Note About How to Add a Table of Contents to Your Sidebar
I have also written a more recent article about how add a table of contents to your sidebar.
Original Article About How to Add a Table of Contents to Your Sidebar
You don’t need a plugin to add a table of contents with WordPress. And if you create the table of contents yourself, you won’t have to worry about performing regular plugin updates. And since you’re just adding html and css, your table should have a high probability of long term compatibility. Although the ideal place for a table of contents is a sidebar you can also use this tutorial to add a table of contents using a custom html block in the body of your page.
You should be able to use almost any theme with a sidebar (or without one if you’re putting the table in the body), but an ideal theme has the following attributes:
- Sticky sidebar
- Options to add or remove your sidebar
- Smooth scroll
I’m using the Big Bob theme in this demonstration because it has all of these attributes and it is available for free through WordPress.org. But you also may want to try some of my other themes.
Step 1: Set Your Anchors
As you’re writing your page or post select a block containing a section or section title that you want to point to then add an anchor into the input box titled HTML anchor under the Advanced tab:
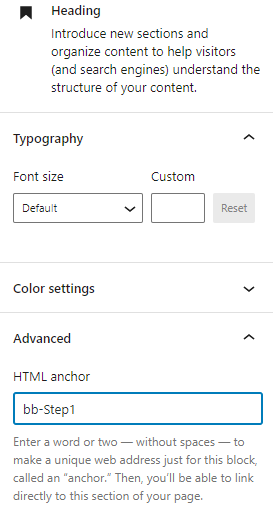
Do this for each section that you want in your table. You can name the anchors whatever you want. And it’s a good idea to add a unique prefix like “bb-” that is unlikely to get confused with something written by a plugin or the WordPress core.
Step 2: Open the Customizer and Add a Custom HTML Widget.
Select preview then in the new preview window, select customize from the admin bar at the top of the page.
Once you’re in the customizer, open up your widgets tab then open up your sidebar tab (this assumes that your theme supports sidebar widgets).
Open up a Custom HTML Block and add the following code into the content section:
<div id="bb-Steps">
	<h2>
		Page Contents
	</h2>
	<ol>
		<li><a href="#bb-Step1">Step 1</a></li>
		<li><a href="#bb-Step2">Step 2</a></li>
		<li><a href="#bb-Step3">Step 3</a></li>
		<li><a href="#bb-Step4">Step 4</a></li>
	</ol>
</div>
Don’t add a title. Write everything into the content section. Replace things like “bb-Step1” with your anchors. Replace things like “Step 1” with your section title. Add or remove the number of list elements as necessary and replace “Page Contents” with your title.
Step 3: Add CSS
You will only want to display your table of contents on the page that it is relevant. First, open up the the Additional CSS section of the customizer and add the following code:
#bb-Steps {
	display: none;
}
.widget_custom_html{
	padding: 0;
}
This will make the table disappear.
Next you want the table to only be displayed on the page that it is relevant. First, add the following.
.postid-634 #bb-Steps {
	display: block;
}
.postid-634 #bb-Steps a:focus{
	outline: none;
	text-decoration: underline;
}
.postid-634 .widget_custom_html{
	padding: 5px;
}
.postid-634 #bb-Steps li{
	font-size: 25px;
	margin-left 2px;
}
.postid-634 #bb-Steps li a {
	margin-left: 10px;
}
.postid-634 #bb-Steps h2{
	font-size: 30px;
}
.postid-634 #bb-Steps ol {
	list-style-type:none;
}
You’ll need to adjust your code so that it is specific to your page. You’ll want to replace where it reads “.postid-634”.
Go back to your block editor page and look at the end of your address bar and find something like the following:
post=634&action=edit
Go back to the Additional CSS section in the customizer and replace the 634 with whatever your number reads, and if you are editing a page instead of a post, then replace “postid” with “page-id”.
Make sure it looks good in your customizer, and if it does, then you should be ready to publish.
Questions About How to Add a Table of Contents to Your Sidebar?
If you have any questions, then please post them in the comments section.