Building a WordPress plugin may seem daunting. But building your own local fonts plugin is actually pretty easy. The great thing about having your own plugin is your fonts will stay with you if you ever decide to change your WordPress theme. There are lots of different plugins that will allow you to set your fonts locally. But most of them feature a lot more overhead than is necessary. Most of what makes loading fonts locally complicated is understanding the font file path and assigning the font families.
This tutorial will be using the Big Themes as an example, but you should be able to use your new plugin with almost any theme that allows you to add custom CSS.
Assumptions
This is an advanced tutorial. You should understand the distinctions between hosting fonts with a third party CDN, hosting fonts locally, and using web safe fonts. You should also understand the basics of setting up a website.
Why Would You Bother Adding Your Fonts Locally?
Hosting fonts locally has become popular among many circles. But I generally don’t advocate for hosting fonts locally if it is unnecessary. Hosting fonts locally introduces a number of new problems that can be avoided when calling fonts from a third party CDN or using web safe fonts. But if it is done properly, then hosting fonts locally can be competitive with a third party CDN, but it probably will not outperform it with any consistency or significance.
In many cases, hosting fonts locally isn’t worth the time and effort. However, there are some reasons that you may want to do it. This tutorial assumes that you understand why you want to host your fonts locally and you have considered your other options such as using the Google CDN or using web safe fonts. It also assumes that you are using your own CDN to host your fonts. If you don’t have your own CDN, then hosting fonts locally will almost certainly slow down your site’s page load speed.
Update (7/31/24)
I have written a new article about Cloudflare Fonts that expands on this blog post’s discussion. It may make it unnecessary for you to go through the hassle of adding a plugin.
GitHub Template
I have created a plugin template called add-local-fonts that you can download and add to your WordPress plugins folder. It isn’t mandatory that you use this template because I will explain how to build your plugin one file at a time. But using this plugin may be helpful because you can use it to get something loaded and working fast, then you can modify it to serve your purposes.
Using CPanel
This demo will show you how to add a new plugin using CPanel. Most major webhosts use CPanel, so there is a good chance that you have access to this feature. If your webhost doesn’t use CPanel, then you will have to access your files using some other resource. If your webhost doesn’t have any kind of file access software, then you will need to set up a file transfer service like FileZilla.
Even if you have CPanel, I recommend using FileZilla to transfer the plugin template. Setting up FileZilla goes beyond the scope of this tutorial. But if you have it set up, then all you have to do is download my plugin, then unzip it, then transfer the file inside of it labeled “add-local-fonts” to your plugins directory.
Building the Plugin Using CPanel
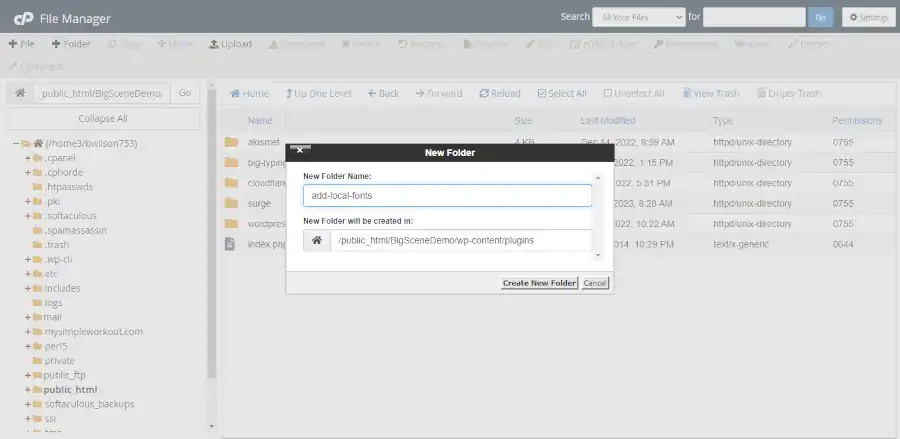
Go to CPanel, then go to File Manager, then find your plugins directory by clicking through the file path “The name of your home WordPress folder” > wp-content > plugins.
Next, click on the button “+ folder”, then create the folder add-local-fonts.
Adding the Local Fonts Main Plugin File
Next, double click your new “add-local-fonts” folder, then click on “+ file” button, then add a blank file named “add-local-fonts.php”.
Then right click the new file and choose edit, then add the following code and save it.
<?php
/**
 * Plugin Name:       Add Local Fonts
 * Plugin URI:        https://bigbobnetwork.com/
 * Description:       Loads fonts locally.
 * Version:           0.1
 * Requires at least: 5.9
 * Requires PHP:      7.4
 * Author:            Bob Wilson
 * Author URI:        https://bigbobnetwork.com/
 * License:           GPL v2 or later
 * License URI:       https://www.gnu.org/licenses/gpl-2.0.html
 */

function big_bob_add_font_scripts() {
    wp_enqueue_style( 'bb-add-fonts', plugin_dir_url( __FILE__ ) . '/bb-add-fonts.css?v=0.1', array() );
}
add_action( 'wp_enqueue_scripts', 'big_bob_add_font_scripts' );
All the main plugin file does is add another file, so now we’ll add that file.
Adding the Local Fonts CSS file
Using the same process, you want to add a file named “bb-add-fonts.css”, then add the following code to the file.
@font-face {
	font-family: Abel-Regular;
	src: url(Abel/Abel-Regular.ttf);
}

@font-face {
	font-family: RobotoCondensed-Bold;
	src: url(Roboto_Condensed/RobotoCondensed-Bold.ttf);
}

@font-face {
	font-family: RobotoCondensed-Regular;
	src: url(Roboto_Condensed/RobotoCondensed-Regular.ttf);
}

@font-face {
	font-family: SpecialElite-Regular;
	src: url(Special_Elite/SpecialElite-Regular.ttf);
}
This is just a template. You want to pay special attention to each file and how it is named and called and formatted relative to the directory path. You will use the same syntax and formatting when you add your fonts. The directory path (the part labeled src) will make more sense once you have added the font files to the plugin.
Choosing Your Local Fonts
This tutorial will show you how to add fonts from fonts.google.com. You can look up the fonts being used in this demonstration on their site and download them from there, or you can take them out of the plugin file in my GitHub repository. However, if you are using Google fonts, you can also let Google host them for you.
But you don’t have to download fonts from the Google fonts website. You can use any fonts that you have a license for. Not having a third party CDN to host your fonts is probably the best reason that I can think of to host your fonts locally.
Add Your Local Fonts Files
When you add files via CPanel, you can’t transfer folders, you will have to create the folder using the instructions above. This is one reason that file transfer software like FileZilla is preferable. All of the folders will have to match the paths defined in the above CSS file. This will be discussed in more detail below.
You can upload files by clicking the upload button. Then you can drag and drop each file into the appropriate folder. Or you can double click the folder you want to add it to and add it directly. You can restructure your folders as you see fit. Or you can put all of the font files in the main folder. However, you decide to structure it, you need to make sure that the paths in the CSS file are consistent with the location of your font files in the plugin.
For example, you could restructure your files like this:
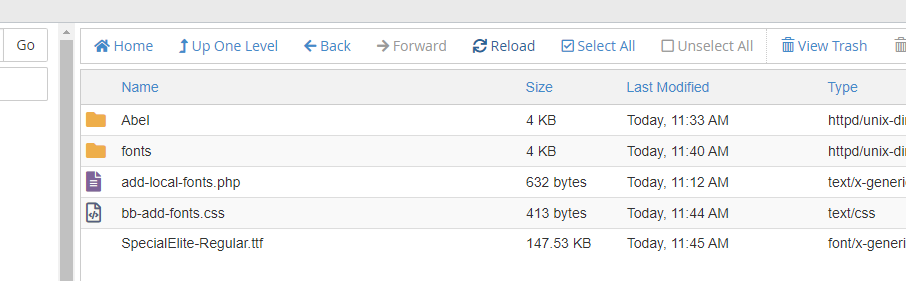
Then update your CSS file to this:
@font-face {
	font-family: Abel-Regular;
	src: url(Abel/Abel-Regular.ttf);
}

@font-face {
	font-family: RobotoCondensed-Bold;
	src: url(fonts/Roboto_Condensed/RobotoCondensed-Bold.ttf);
}

@font-face {
	font-family: RobotoCondensed-Regular;
	src: url(fonts/Roboto_Condensed/RobotoCondensed-Regular.ttf);
}

@font-face {
	font-family: SpecialElite-Regular;
	src: url(SpecialElite-Regular.ttf);
}
Add Additional CSS to the customizer
At this point, if you’re logged into to your WordPress admin center, then your file paths may not be saved and/or cached properly to your WordPress admin center. Before you go any further, you probably want to either completely close down your browser, or open your wp-admin in a new incognito (in private) browser, or use a different browser.
It can also be helpful to update the version number in your PHP file. This means you can change the demo from:
bb-add-fonts.css?v=0.1to:
bb-add-fonts.css?v=0.2Once you are in your WordPress admin center go to Appearance > Customize > Additonal CSS.
If you are using any of the Big Themes, and you are still using the demo fonts, then you should be able to add the following code to the Additional CSS section and notice an immediate change in your fonts. But if you don’t see a change, then try an incognito window or a different browser. You can also try changing the version number in the PHP file using the method referenced earlier.
/*Title Fonts*/
.site-title, .bb-site-title-top,
.bb-forest-cover h1,
.bb-forest-cover h2,
.bb-forest-cover h3 {
	font-family: RobotoCondensed-Bold  !important;
}

/*Heading Fonts*/
h1, h2, h3, h4, h5, h6, .site-description, .bb-site-description-top {
	font-family: RobotoCondensed-Regular !important;
}

/*Paragraph Fonts*/
body,
p, pre, textarea, .comment-author, .entry-content li, .wp-block-latest-posts,
.entry-meta,
.entry-footer,
.nav-links,
.comment-metadata,
.reply,
input,
select,
optgroup,
.bb-sideStick li,
#bb-sideSlide li {
	font-family: Abel-Regular!important;
}

/*Menu fonts*/
#primary-menu li,
#bb-sidebar-menu li {
	font-family: SpecialElite-Regular !important;
}
If you aren’t using the Big Themes, then you’ll need to determine your font classes by inspecting them in your browser.
Remove All Calls to the Google CDN
You should remove any calls you have to the Google CDN since you are no longer using those fonts.
It’s easy to remove calls to the Google CDN if you are using the Big Themes. Just go to the Typography section of the Customizer and delete everything from the input boxes including white space.
If you aren’t using one of the Big Themes, then you will have to consult your theme’s documentation to determine what to do.
Confirm that the Google CDN Calls Have Been Removed
You can confirm that your site is no longer making calls to the Google CDN by opening up your browser’s developer tools. Once you have done this, look into the HTML section and try to find any reference to “fonts.google”. If you can’t find any references, then you know that the Google CDN calls have been removed.
Make Sure That Your Site is Redirecting to Your SSL Page
If you are using an SSL certificate, then it is always a good idea to make sure that visitors are always being redirected to it, but it’s significance can be more apparent when hosting fonts locally.
If a site visitor doesn’t go onto to your https version of your site, then the wrong fonts will probably be delivered if you are hosting locally. When you add your fonts locally, you are defining their location through a relative path. This is something that you don’t have to worry about if you are using web safe fonts or the Google CDN.
What should you do if your site isn’t redirecting properly?
If your WordPress site is your homepage, then usually all you have to do is go to Settings > General then make sure that WordPress Address and Site Address both start with https.
If your homepage isn’t part of WordPress, then you can update your .htaccess file using CPanel by adding the following to the top of the file.
RewriteEngine On
RewriteCond %{HTTPS} !=on
RewriteRule ^ https://%{HTTP_HOST}%{REQUEST_URI} [L,R=301]

RewriteOptions inherit
RewriteEngine on
Header set content-Security-Policy: upgrade-insecure-requests
Questions About Adding Local Fonts?
If you have any questions, then feel free to post them in the comments section.