
Caching with a shared server can be complicated, but it is worth the effort. Shared servers suck because they’re slow, but they’re also cheap, so we use them anyway. When you first launched your site, it may have been small, and it didn’t do very much, and nobody was looking at it. And if the site’s foundation was simple HTML (not PHP), then it probably loaded pretty quickly, even if it was running on a shared server. But if your site got more popular and complicated, then you may have noticed your pages started loading slower and slower.
If this is your situation, then you’ve reached a line of demarcation, where you have to change how you manage your site. You may be able to resolve the problem by switching to a cloud server or a dedicated server. However, this will likely cost you money, and it will probably be complicated. However, you can also upgrade your caching which has varying degrees of complexity, but it’s something that you can do for free.
The Easiest Way to Read this Article
There is no TL;DR for this article. It’s long and so is following all of its instructions. It’s probably not realistic for you to deal with all of this in one sitting. But if you try to learn and implement a little at a time, then you may be able to substantially improve the performance of your website. So bookmark this page, and block off some regular time each week to pick your way through it.
This Article is Primarily About WordPress
Although the principles discussed in this article can be applied to any website, in order to implement all of the instruments discussed in this article, you will need to be running a WordPress website.
How Much Do You Need to Depend on Your Host Server?
This article assumes that a shared server is appropriate for your website. If you are using a shared server, then you should not be running a site that requires frequent content updates. For example, running an e-commerce site on a shared server is a bad idea. Any site that requires frequent updates from the host, especially partial page updates, needs a higher quality server. However, if your site is viewed from a static state, and requires infrequent updates, and doesn’t get too much traffic, then a shared server should be fine.
Things that Cause a Slow Page Load Time
Web page speed is complicated. And it’s easy to blame the wrong culprit. Here are four of the biggest causes of slow page speed:
- Size of the files being downloaded to the browser.
- Server processing time.
- Physical distance of the page caller from the host.
- Unnecessarily redundant page calls.
Dealing with File Size: Pick a WordPress Theme with Fast Loading Potential
There’s no such thing as an inherently fast WordPress theme. Any theme that claims that it is inherently faster because it is lightweight by virtue of total byte size is misleading you. While it is true that a theme with a lower total byte size allows for a greater margin of error while still producing a relatively fast page load time, it is not true that a theme with a larger total byte size is inherently slower. On the contrary, if the theme is used properly, it could load even faster than the theme with the smaller total byte size because the individual pages being loaded are smaller. And themes with relatively larger byte sizes often have more features. And poorly implemented low byte sized themes will still load badly. However, this is not meant to imply that byte size bloat in themes should not be a concern.
Having said all that, it can be quite difficult to determine what WordPress themes have a fast loading potential, especially if you can not make a quick assessment based on file size. At the risk of performing a shameless plug, I can tell you that all of my Big Series Themes can load pretty fast when implemented properly, and this article will tell you almost everything you need to know about proper implementation. If you are not sure which theme to pick, then I recommend my Big Media theme. All of the themes are free. And you can download them directly from your WordPress admin center. If you have any questions about any of these themes, then feel free to post them to my forum.
Other File Size Considerations Before Caching with a Shared Server
The size of every file that you load to a person’s browser impacts the loading speed. You need to pay attention to the file size of everything that you add to your site from plugins to images. You want to keep every file you have as small possible when it loads to your user’s browser (as opposed to when it is running in your admin center).
Slow Server Processing Time: Caching is the Primary Remedy for a Slow Shared Server
If you are trying to load your site from a shared server, then you are trying to load it at a disadvantage because you have to compete for processing power with the other people that you are sharing a server with. The key to overcoming a slow loading shared server is caching. There are three places that you can capitalize on caching:
The Three Caching Points when Caching with a Shared Server
This tutorial will teach you how to manage the three major caching points:
- Your host’s server’s local cache.
- The cache of your content delivery network.
- The cache in your user’s browser.
Don’t Cache the Same Cache Type when Caching with a Shared Server
You might be tempted to believe that if one cache speeds up your site, then two will make it even faster. After all, isn’t this tutorial trying to teach you how to set up three different caches? That’s true, but that doesn’t mean that there is an advantage to redundant caching. The thing you need to realize is sometimes your cache will be empty. So you will have to route the request all the way to the origin.
Suppose you have two caches and both of them are empty. If they are both of the same cache type, then if one is empty, the other is probably empty too. So if someone makes a call for one of your webpages, then you have increased the amount of time that it takes for your site to load because it takes longer for the page call to reach the origin because you are requiring the call to check two caches instead of one. Also, if one of your caches only has some of the files that are necessary, then the other cache will also probably have the same files, and once again the call will create unnecessary file read time. The bottom line is you only want to use one product for your local cache, and one product for your CDN, and you want to set only one set of rules for your user’s browser’s cache rules.
Reduce Your Server Processing Time: Caching Your PHP
Server speed matters, and shared servers are slow. I don’t want to be misleading about that. But even if you have a slow server, if you can give it less to process when a user makes a call for one of your pages, then you can improve its speed. One of the simplest and most important caching steps that you can take is caching your PHP pages on your host server. There are a number of plugins that provide local caching. Some of them are good. Some of them are bad. And a lot of them are complicated. So I’m going to try to help you find an effective path that isn’t too complicated.
UPDATE (October 2023): PHP Caching and the Latest Versions of WordPress and PHP
The speed of PHP and WordPress has improved quite a bit since this article was originally published, and using page caching to support it has become a thing of of more questionable efficacy.
Dealing with the Endurance Cache when Caching with a Shared Server
If you are using a shared server, then there is a good chance that you have had the endurance cache imposed upon you. I’ve used it in the past, but I no longer recommend it. Its documentation is nearly nonexistent and its performance is inconsistent. Fortunately, turning it off so that you can use a different local cache plugin is pretty easy. Just go to your admin page and click on where it says “caching” at the top of the page, then select “cache settings” from the dropdown. Scroll down to the bottom of the page and set the Cache Level dropdown to “Off (Level 0)”.
Next, you’ll want a local PHP page cache that works well and is easy to install. I recommend Surge. All you have to do is go to Plugins > “Add new”. Then type “Surge” into the search field, then install it, then activate it. That’s it. You don’t have to do anything else. Pretty nice, huh? I’ve been using Surge for awhile, and every performance measure I can think of seems to show that it’s working well.
Reduce the Physical Distance of the Page Call: Caching to a CDN
A CDN is a content delivery network. A CDN moves copies of your site all over the world so that it is physically closer to whomever is asking for it. This places less demand on your host server, and requires less time for a call to move the requested files because the distance is shorter, thus making it reach the caller’s computer faster.
CDN Options: Jetpack versus Cloudflare
Jetpack is a huge WordPress plugin series that has all kinds of features, including those that improve page load speed. Cloudflare is primarily a content delivery network that is all about helping your pages load faster.
Jetpack is easy to install, and Cloudflare can be a bit tricky, but Cloudflare is substantially more effective.
If you want to try out Jetpack, it’s pretty easy to try. Hypothetically, Cloudflare is compatible with Jetpack, but my experience is the two don’t seem to play well together. Even when I have turned off the features of Jetpack that are redundant to Cloudflare, I still find that there are problems with Jetpack. In particular, I find that there are problems when I update Jetpack. Since I don’t really get much out of Jetpack when I’m using Cloudflare, and I’m sick of troubleshooting, I’ve decided to remove Jetpack from all of my sites. I’m not saying that you necessarily need to do that for your site. But you need to take responsibility for your choice.
Setting Up Cloudflare when Caching with a Shared Server
Okay. This is where we separate the big kids from the little kids. Unfortunately, the instructions that you need to set up Cloudflare will vary depending on which webhost you use, so you’re going to have to look up your instructions on your own. All I can do is give you a little general advice: Measure twice and cut once. If you make a mistake, it can mess up your site, so be careful. It’s time to see how DIY you really are. Hopefully, I’ll see you on the other side.
The Other Side: Controlling CDN Cache Time
Did you make it? Did you set up Cloudflare? Are you reading this before you even tried? You shouldn’t be. The rest of this tutorial will be useless to you until you’ve set up Cloudflare. Don’t be a wimp. You can do it. If you mess up, then try again.
Okay. Did you really actually honestly set up Cloudflare? Well then, great job! I’m proud of you.
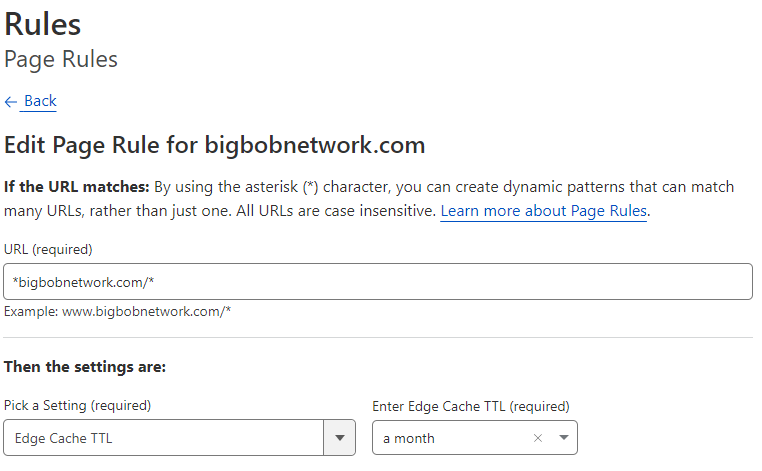
Next, you’re going to want to maximize the amount of time that your files spend in the Cloudflare CDN cache. Cloudflare has a thing known as page rules. These rules can be used for all kinds of purposes. But you’re going to need to use one in particular to encourage Cloudflare to keep your files in its CDN cache for as long as possible. In the Cloudflare admin, select your domain then find the page rules section and enter the following rule (obviously, you should update for your own domain):
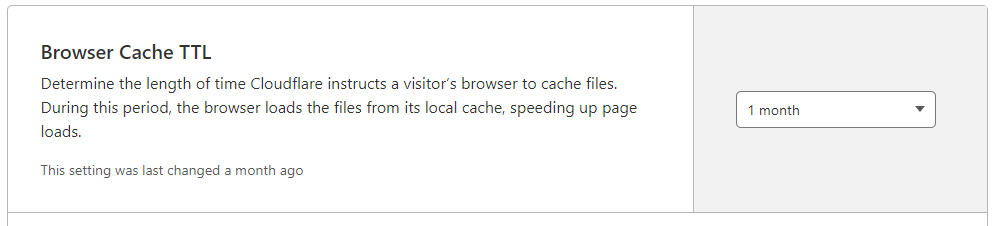
Avoid Unnecessary Page Calls: Controlling Browser Cache Length
Did you know that you can tell a browser how long you want it to cache your site? It’s true. And they will usually do what you tell them to. But to be clear, they don’t have to, especially if their users tell them not to. But most of the time that doesn’t happen, so it works out. All you have to do is select your domain then go to Caching > Configuration, and make the following selection:
Caching HTML to a CDN when Caching with a Shared Server
Cloudflare doesn’t cache your html But there’s a free plugin called Super Page Cache for Cloudflare. If you follow the instructions, you should find that it isn’t too difficult to set up if you already know how to set up Cloudflare. The thing that you need to understand is that when you load the plugin, you need to use at least one of your page rules, and the number of page rules that you have available will limit how many WordPress sites you can add to a domain. The plugin will add your new site page rules for you. But you will probably need to reset your Edge Cache TTL when you set it up (and sometimes when you update the plugin), and you will have to make sure that your new page rules are in the proper order as follows:

Make sure “Cache Everything” rules are at the top. If you don’t put the page rules in the proper order, then the HTML will not cache properly.
Browser Caching when using Super Page Cache for Cloudflare
If you decide to add the super page cache plugin, then you will want to go back to the Browser Cache TTL referenced above and set it to “Respect Existing Headers”. Then go into the Super Page Cache admin panel, then select the Cache tab, then go all the way to the bottom of the page and set the “Add browser caching rules for static assets” switch to yes.
Conclusion
Hopefully, you’ve enjoyed your DIY caching experience. And if you didn’t, hopefully you’re at least enjoying the results. But even if you have merely improved, and you still think your site should be faster, think of how fast your site will be once you can take everything that you have just learned to a higher quality server.