The Simplest Way to Change Your WordPress Theme

Changing your WordPress theme can seem daunting. You may be afraid that if you screw something up, then you won’t be able to fix it. The reality is that changing your WordPress theme is one of the safest and most powerful updates that you can perform because if anything goes wrong you can always just revert back to your old theme. If fear has held you back, then perhaps it is time to change your WordPress theme.

Assumptions

Make sure you understand the basics of building a site before reading this post.

Step 1: Look at Your New Theme and Take Notes Before You Change Your WordPress Theme

The first thing you want to do is open your customizer on your existing theme. Then while leaving your current theme open, you should open up a second window, then open up the customizer, then select “change theme” and open a live preview box.

If you are still in the process of considering what theme to use, then I recommend trying one of the Big Themes.

DON’T push the “Activate and Publish” button. For now, all you want to do is look at your existing theme, then experiment with the controls in your new theme and take notes. You want to write down what changes you will have to make using your new controls. Take your time. The principle of this exercise is to follow the old expression, “Measure twice and cut once.”

Your notes should be detailed enough that when it’s time to make the updates in the customizer, you will be able to do it quickly.

PRO TIP: The customizer isn’t perfect. The customizer is just a representation of how your site is supposed to behave. It doesn’t always behave the way a live site would behave. Some features (like links leading away from the site) simply don’t work in the customizer. Other times, you may notice that you hit a control to make a change and the change doesn’t happen. If this happens try reverting the control back to its original setting, then switch it back again.

Step 2: Reconsider Your Plugins Before You Change Your WordPress Theme

Open up a third window and consider every plugin you have that influences appearance. Does your new theme already provide the needs of the existing plugin? If it does, then you should probably get rid of the plugin.

Do you want to keep your plugin because your theme doesn’t provide the plugin’s option? Is your plugin compatible with your new theme? If not, it may be time to get a new plugin. Better yet, if your new theme doesn’t provide the plugin option, then maybe the latest version of WordPress provides it as an option. Take a look at the latest blocks.

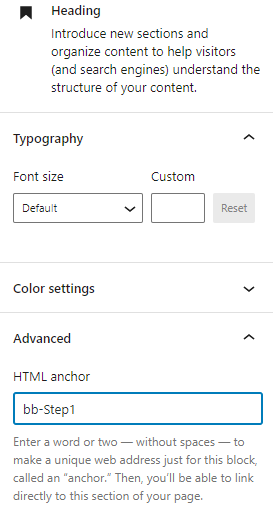
Step 3: Consider Theme Block Extensions Before You Change Your WordPress Theme

Lots of new themes have styling options in the form of block extensions. If yours does then consider what they can do. Unfortunately, there’s no way to experiment with these options without activating your new theme. So unless you have a WordPress site on a local server or a dummy site that is ignored by search engines that you can experiment with, you won’t be able to experiment with these options. If you don’t have either of these test environments set up already, then I wouldn’t try to set one up because it can be pretty complicated.

Step 4: Consider Putting Your Site into Maintenance Mode

If you think that you can set up your new theme using just the customizer, then you may not need maintenance mode. If you think that your page settings are going to benefit greatly from the theme’s block extensions, then consider getting a Maintenance Mode plugin. However, if you think that that the page settings can be updated after the new theme is launched, then you probably don’t need to put your site into maintenance mode.

Step 5: Update to Your New Theme

  1. Put your site into maintenance mode (if necessary).
  2. Restructure plugins (if necessary).
  3. Use your notes to make the updates in your customizer, then Activate and Publish.
  4. Update individual pages (if necessary).
  5. Take your site out of maintenance mode (if necessary).

Hopefully, you noticed that only one step is mandatory. And remember, if anything goes wrong, you can always just activate and publish your old theme.

Questions About Changing Your WordPress Theme?

If you have any questions, then please leave them in the comments area.

The Best FREE WordPress Plugins for Improving Website Loading Speed

Update About Plugins Improving Loading Speed

Since I originally wrote this post, I have written an updated post about improving page load speed. These plugins aren’t bad for improving loading speed, but I am no longer using any of the plugins in this article.

Original Article About Improving Loading Speed

Plugins are a great way to bring your WordPress site loading speed to a crawl. But the right plugins can actually make your site considerably faster. If your site is running slowly, you can speed up its loading time using the following tools.

Before You Use These Plugins

Even if you use the following plugins, you need to understand that the size of your media files and your choice of web host can have a high impact on performance. You should always minimize the size of your media files to the lowest sizes necessary (your file sizes should be able to be measured in kb, not mb); and even if you use a solid web hosting service, if you try to save money using a shared server (like I do), then you’ll find that from time to time your site won’t load as fast as you might like, especially on mobile.

A Caching Plugin for Improving Loading Speed

There are multiple free caching plugin options, and my experience is that they perform about the same. If your web host provides you with a caching plugin, then it is probably Endurance Cache. It is not the most user friendly plugin, but you can learn how to use it here. If you don’t have that available, then I recommend WP Super Cache. The reason I recommend Endurance Cache first is WP Super Cache can become complicated to use because of your individual web host’s server settings.

Jetpack CDN for Improving Loading Speed

Jetpack is a big plugin. In addition to the CDN, it provides a number of cool blocks. But when you’re talking about site speed, you just need to deal with the Jetpack CDN.

What’s a CDN?

A CDN is a Content Delivery Network. When people try to get onto your site, physical distance matters. Jetpack CDN takes some of your biggest files (the images) and tells people that they can get the images from servers closer than your web host’s server. To turn on Jetpack’s CDN, just go to Settings > Performance, then turn everything on. This should include lazy loading which tells the browser to just load the images that can be seen and wait to load the other images when users scroll down to look at them.

Jetpack Boost for Improving Loading Speed

Jetpack Boost is a separate plugin——and free. No. Jetpack isn’t paying me. I just have to admit that their stuff works really well. In fact, I’ve used it on my own software, and I have noticed a big improvement in loading time, especially on mobile. I’m the kind of developer that’s okay with sacrificing a little speed so I can use higher quality media. The Jetpack Boost plugin allows me to have my cake and eat it too. Also, if you like to make custom modifications, this plugin will help offset any speed compromises that you may have made. All you have to do is add the plugin and follow the instructions. It’s pretty straight forward.

Conclusion

That’s it. You don’t need to know the history of the World Wide Web to make these updates. So go make it happen.

How to Add a Table of Contents to Your Sidebar with WordPress

Author’s Note About How to Add a Table of Contents to Your Sidebar

I have also written a more recent article about how add a table of contents to your sidebar.

Original Article About How to Add a Table of Contents to Your Sidebar

You don’t need a plugin to add a table of contents with WordPress. And if you create the table of contents yourself, you won’t have to worry about performing regular plugin updates. And since you’re just adding html and css, your table should have a high probability of long term compatibility. Although the ideal place for a table of contents is a sidebar you can also use this tutorial to add a table of contents using a custom html block in the body of your page.

You should be able to use almost any theme with a sidebar (or without one if you’re putting the table in the body), but an ideal theme has the following attributes:

  • Sticky sidebar
  • Options to add or remove your sidebar
  • Smooth scroll

I’m using the Big Bob theme in this demonstration because it has all of these attributes and it is available for free through WordPress.org. But you also may want to try some of my other themes.

Step 1: Set Your Anchors

As you’re writing your page or post select a block containing a section or section title that you want to point to then add an anchor into the input box titled HTML anchor under the Advanced tab:

Add a Table of Contents to Your Sidebar

Do this for each section that you want in your table. You can name the anchors whatever you want. And it’s a good idea to add a unique prefix like “bb-” that is unlikely to get confused with something written by a plugin or the WordPress core.

Step 2: Open the Customizer and Add a Custom HTML Widget.

Select preview then in the new preview window, select customize from the admin bar at the top of the page.

Once you’re in the customizer, open up your widgets tab then open up your sidebar tab (this assumes that your theme supports sidebar widgets).

Open up a Custom HTML Block and add the following code into the content section:

<div id="bb-Steps">
	<h2>
		Page Contents
	</h2>
	<ol>
		<li><a href="#bb-Step1">Step 1</a></li>
		<li><a href="#bb-Step2">Step 2</a></li>
		<li><a href="#bb-Step3">Step 3</a></li>
		<li><a href="#bb-Step4">Step 4</a></li>
	</ol>
</div>

Don’t add a title. Write everything into the content section. Replace things like “bb-Step1” with your anchors. Replace things like “Step 1” with your section title. Add or remove the number of list elements as necessary and replace “Page Contents” with your title.

Step 3: Add CSS

You will only want to display your table of contents on the page that it is relevant. First, open up the the Additional CSS section of the customizer and add the following code:

#bb-Steps {
	display: none;
}
.widget_custom_html{
	padding: 0;
}

This will make the table disappear.

Next you want the table to only be displayed on the page that it is relevant. First, add the following.

.postid-634 #bb-Steps {
	display: block;
}
.postid-634 #bb-Steps a:focus{
	outline: none;
	text-decoration: underline;
}
.postid-634 .widget_custom_html{
	padding: 5px;
}
.postid-634 #bb-Steps li{
	font-size: 25px;
	margin-left 2px;
}
.postid-634 #bb-Steps li a {
	margin-left: 10px;
}
.postid-634 #bb-Steps h2{
	font-size: 30px;
}
.postid-634 #bb-Steps ol {
	list-style-type:none;
}

You’ll need to adjust your code so that it is specific to your page. You’ll want to replace where it reads “.postid-634”.

Go back to your block editor page and look at the end of your address bar and find something like the following:

post=634&action=edit

Go back to the Additional CSS section in the customizer and replace the 634 with whatever your number reads, and if you are editing a page instead of a post, then replace “postid” with “page-id”.

Make sure it looks good in your customizer, and if it does, then you should be ready to publish.

Image Credit

Questions About How to Add a Table of Contents to Your Sidebar?

If you have any questions, then please post them in the comments section.

A Critique of Unnecessarily Complicated Web Design

Unnecessarily complicated web design is frustrating. Picture a great artist with great ideas for paintings. What difference does it make if he has no ability to paint? Being creative just isn’t good enough. Everybody has an imagination, and I think you’d be hard pressed to find somebody that has never gone to sleep and dreamed about something that never actually happened. Having an imagination doesn’t make you an artist; it just makes you human. To be an artist, you have to have the skills to use tools as well as the ability to interpret what constitutes legitimate quality.

What constitutes a great website is subjective. Some people like certain web styles and other people like others, but that’s not what this post is about. All too often in web development, both website owners and web developers have a desire to be unique and a desire to show off. This is a bad combination that often results in a crappy user experience. Rather than over generalize, I’m going to critique two pet peeves of mine that I see too often.

Pet Peeve #1: The Slider that Serves No Purpose

There are just too many sliders on websites nowadays. I was just using a website the other day that had a series of articles grouped by subject all on the same page. Good idea. But as I scrolled down, I noticed that each subject only had three articles or less attached to them, then I took a closer look and noticed that some of the subjects had an arrow to the right of them that was pointing off screen. So I clicked on one a few times and found a couple of articles I wanted to read. I read one then clicked the back button.

When it took me back to the previous page, the slider had reset, so I had to click through it again to find the other article. Annoying. Then I got to the second article, and there was an image slider at the bottom that was set to automatically slide. I saw an image I wanted to study, but when I clicked on it, it only stopped for a moment then kept on sliding. Really annoying. I mentioned it to my wife who had told me about the page, and she said, “Oh, I didn’t see the arrow. I didn’t realize there were more articles that you could scroll through.”

What’s the point of all this? If the image and articles had just been set left to right and top to bottom, the pages would have been a lot easier to build and a lot easier to use. Who’s the winner with these ideas? This is unnecessarily complicated web design

Pet Peeve #2: Query Result Extenders with Too Many Results

Can you picture searching for something on Google then reaching the bottom of the page then seeing a button that reads something like, “More Results”. Actually, they do this on their mobile version of their search engine which is a feature I don’t love. But they don’t do it on their large screen search engines, and my guess is that their reason is it wouldn’t be functional. Have you ever had a list of search results that you have looked through more than once? And you don’t want to look through every page; you just want to jump ahead a few pages forward. My guess is Google realizes that which is why they offer paginated results.

On a couple of occasions, I can remember reading blogs where I was looking through a series of results and finding multiple articles that interested me, but I can also remember getting fed up and not bothering to read all of the articles because whenever I clicked back to the results page, instead of being able to click to an exact page with an article link, I had to click the “load more” button over and over again to try to get it to spit out the link I was looking for.

Unnecessarily Complicated Web Design

The Bottom Line About Unnecessarily Complicated Web Design

This isn’t a rant against all sliders and result extenders. They have appropriate uses. But they shouldn’t be used just because you think they look cool and you’re technically capable enough to implement them. And this is true of all features that can be cool under the right circumstances.

Being creative and unique is not a virtue unto itself, and neither is technical aptitude. The most important element is creating a fluid user experience that gets users what they’re looking for. Your website isn’t really about your website. It’s about your website’s content. Your website’s job is to aid people in reaching your content, not get in the way. At a certain point during the website development process, a conflict between presentation and accessibility will emerge, and it is usually best to avoid significant compromises to accessibility for the sake of presentation.

Image Credit

Image Credit

Do You Want to Learn More?

Learn about how to create a long term plan for building and maintaining a website.

How Much Can You Depend On a Browser’s Performance?

When you create a website, one size never fits all. You always have to consider screen size and you always have to consider how different browsers will interpret your website’s code. But there is no way around it. Some browsers just plain damn suck. But you still have to consider browser performance.

Before you decide whether or not it’s the browser’s fault or your site’s fault, you need to make sure that you understand how browsers interpret information. Almost every browser does something unique. And mobile browsers tend to make considerable distinctions in how they interpret information as compared to laptop and desktop browsers.

But even if you have given consideration to all those unique concerns, you still may find that your site just doesn’t run well on some browsers. A good rule of thumb is if you can (and frequently have to) hit the refresh button to get your site running properly, then it is safe to consider the problem as being exclusive to the browser and/or the operating system, and it is unlikely that any amount of coding wizardry will solve your problem.

So What Do You Do Next About Browser Performance?

The simplest and most conservative thing to do is to just dumb your site down. Whatever isn’t running well, you can just remove it. If the problem is on a major browser, you might have to use this option. But more than likely, the issue is the problem is on a more obscure browser.

You could write an exception into your program. It is generally not a great idea to try write exceptions based on specific browsers. But you can write exceptions based on screen size or browser behavior. But what if the exception casts too wide a net? Or what if the exception simply doesn’t solve the problem? And what if removing the problem-causing feature requires you to substantially deteriorate the performance of your site for most users for a problem that is rare?

Well, then you have to ask yourself, how rare is it? And how much longer will it last? Bad browsers tend to cause problems on many sites, and users get sick of using them.

If you are finding that hitting refresh gets your site running properly, than it may mean that your site is a little advanced for the browser or operating system that you’re using. Which means that it’s probably a piece of technology that fewer and fewer people are using, and you might just want to let its poor performance slide.

If your website is any good, it probably isn’t that hard to find a browser that is older and more obscure and runs your site like crap. The only remaining question is, is the browser old enough and obscure enough that you can stop worrying about it?

Image Credit

Learn More

Read my article about creating a long term plan for building and maintaining a website.