Posts

How to Build a One Page WordPress Website

This tutorial is a step by step guide showing you how to set up a one page WordPress website. It is meant to be read after my previous post.

Step 1:
Set Your Site Up with the Big Scene Theme

First, you’re going to want to set up your site with the Big Scene theme. Just follow this link to my last post.

Step 2:
Set Your Homepage

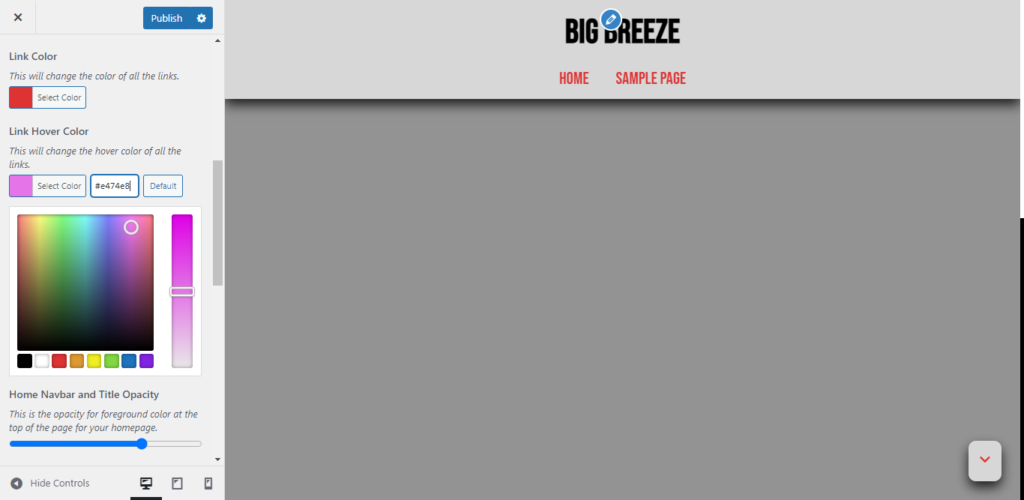
Now, you’re going to go to the “Homepage Settings” section of the customizer. Under the control “Your Homepage Displays”, select “A static page”, then select a page or add a new page if you don’t have one. Make sure that nothing is selected for the posts page section.

Step 3:
Turn Off the Underline Current Page Feature

Go to the Navigation section, then find the “Underline Current Page” tagline and turn it off. If you don’t see this control then you’ll need to leave the customizer and go back out to the admin center then go to the dashboard tab in the upper left hand corner then select updates and update to latest version of the Big Scene theme.

Optional

You may want to go into the Layout Section and turn off the “Page Titles” control.

Step 4:
Remove Your Excess Pages

Leave the customizer and go back out to the main admin page. Go to the pages and posts sections and delete every page that isn’t the front page, unless the page is important. If the page is important, then click edit under the page title, then when you’re inside the block editor click on “switch to draft” if it is not a draft already.

Step 5:
Create Your Sections

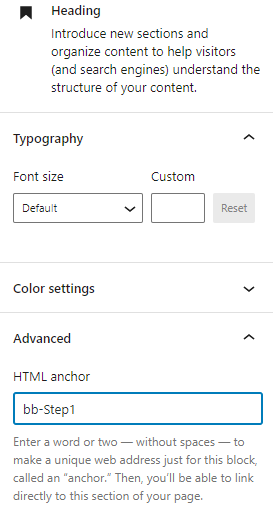
Your page should be broken up into different sections. You can define each section by adding heading blocks. For each heading block you’ll need an html anchor that can be found by looking under the advanced tab in the block section for the heading block.

If you are having trouble seeing this, then right click it and select “Open image in new tab”.

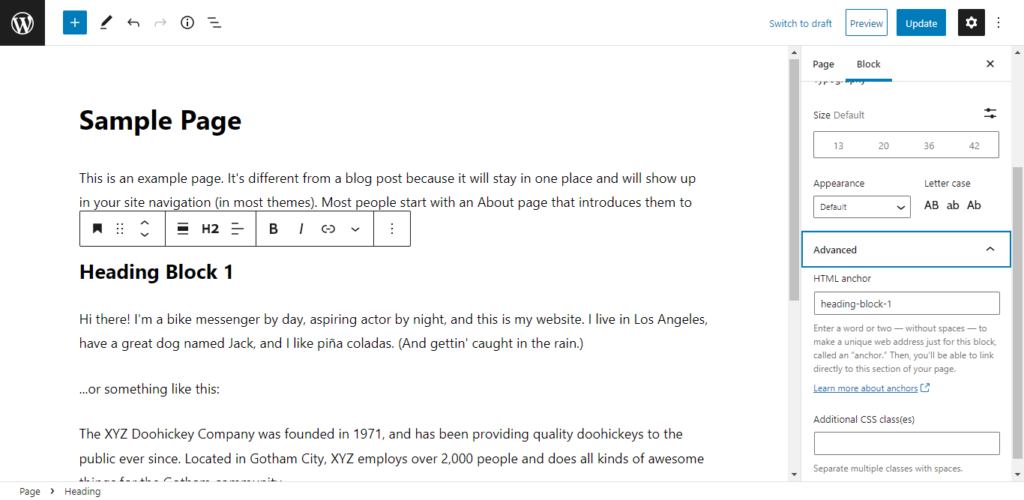
If you have WordPress 5.9 or greater, the anchor should be filled automatically. It’s also not a bad idea to add a prefix to each title such as “bb-” so it doesn’t get confused with an anchor created by WordPress or another plugin. You should make sure that your titles are intuitive because you’ll need to remember them later.
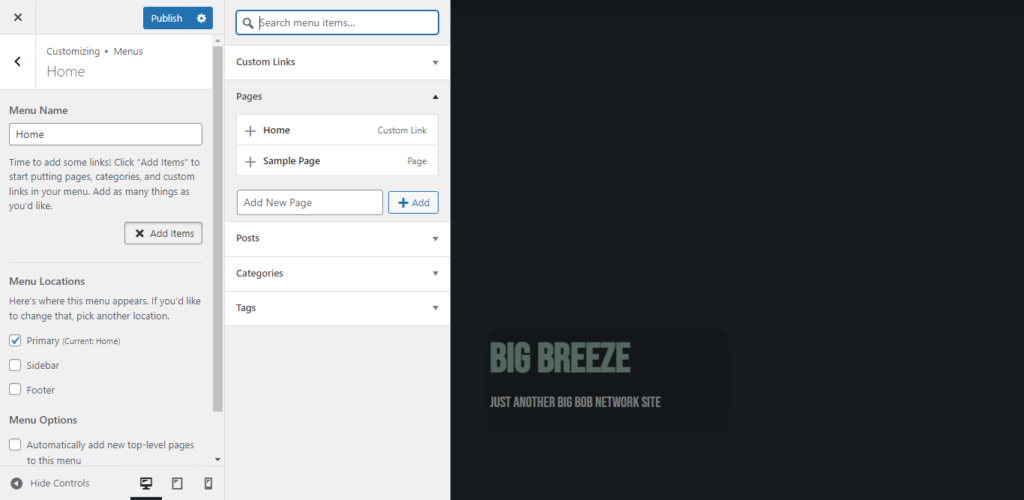
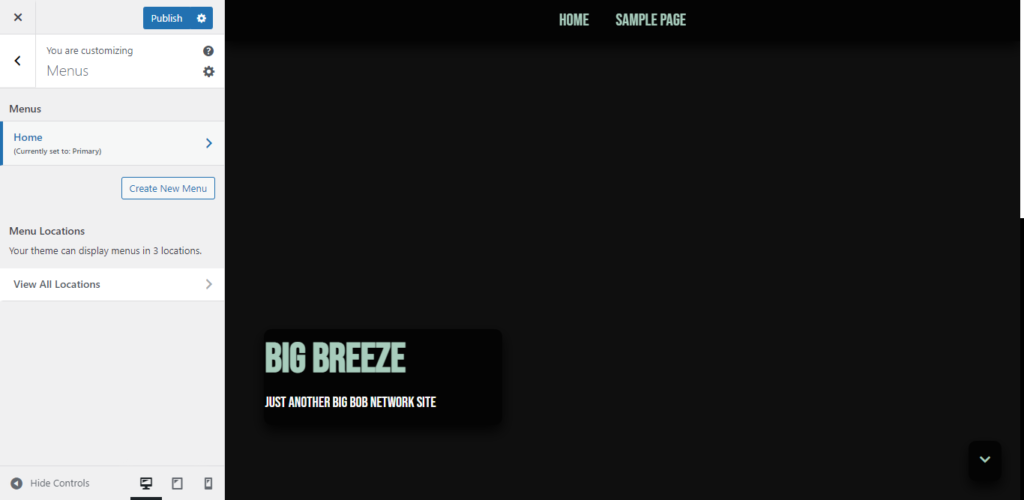
Step 6:
Create Your Menu

Go back out to the main admin page then go to Appearance then menus. Select “create a new menu” then add your links under the custom links section. In the URL section, type in “#” followed by name of the html anchor for each section.

If you are having trouble seeing this, then right click it and select “Open image in new tab”.

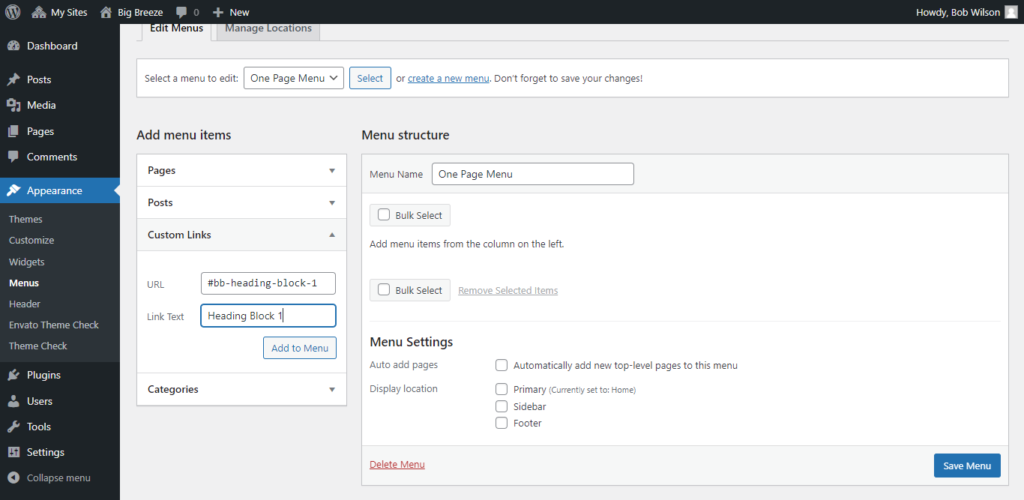
When you’re done adding all your pages, check the Primary box in the display location section and click save menu.

Step 7:
Test Your Page for Your One Page WordPress Website

Test out your page and make sure that you like the way that it looks. When you click on each link, it should scroll to the appropriate section. Make adjustments as necessary.

If you have any questions, then please post them in the Big Scene forum.

image credit

How to Build a New WordPress Website Using Just One Image

TL;DR

You can use the Big Scene theme to quickly build a great looking simple website:

Today I’m going to teach you how to start a new website using just one image. When building a website, it’s important to understand that websites are dynamic, and they’re meant to grow over time. So it’s not a bad idea to start with something simple that you can expand on. Maybe you have a business, or maybe you just have an idea. Whatever it is, it’s something that you need to claim as your own, and you know social media just isn’t good enough.

Assumptions

Building your own website can be daunting, especially if you want to do it all yourself. This tutorial assumes that you already know how to set up your own web hosting. Setting up a web host is a subject unto itself. If you want to try setting up a host on your own, there are already tons of great articles out there. So if you need a web host, you can just bookmark this page and google “web hosting.”

This article also assumes that you know how to set up WordPress on your webhost. How you do this will vary from host to host.

The Big Scene Theme

This tutorial utilizes the Big Scene theme. You can download it for free in your WordPress admin center. Just go to Appearance > Themes > Add New. Then type in the key phrase “Big Scene” into the search bar. Once you see it, select install, then select activate.

You may have noticed that this site is running on the Big Bob theme. The Big Bob theme is a great theme if you’re already using it. The Big Scene theme is like the Big Bob theme only it has more features and it has existing features that have been modified for user friendliness.

The Big Scene theme is a customizer driven theme with block extensions. With the release of WordPress 5.9, you may be wondering about the future of the customizer with the availability of the new site editor. But if you have tried out the new site editor, then you saw the beta tag on the menu option, and you can see it has a lot fewer options than the customizer. The site editor may be a great option in the future, but it will need to grow a bit before we can abandon the customizer. Right now, it’s safe to say that the new site editor is probably not a good option if you want to build a simple website that you can later expand upon.

Questions

If you have any questions after reading this tutorial, then please post them to the Big Scene forum.

The Customizer

As you’re working your way through this tutorial, you will want to hit publish on occasion, and you will also want to occasionally refresh the page. The customizer uses a mechanism known as selective refresh which means it doesn’t always refresh the entire page which means you don’t always see all of the changes.

Since you are just starting your site, you shouldn’t be too concerned about people finding it while it’s in the process of being built. Websites with content can be difficult to find, and websites without content are almost impossible to find. However if you are still concerned, your webhost may include a service that allows you to tell web crawlers not to search for your site, or you can use an under construction plugin.

The Big Scene theme has features that extend beyond the customizer. But the customizer is where you will do most of your work. To get started, go to the side menu in your admin center then select Appearance > Customize. You should see a screen that looks like this:

If you have trouble seeing this or any image, you can right click on it then select “open image in new tab.”

The Navbar Menu

If you have a tagline, then you may want to leave the navbar in the default settings. But if you leave it in the default settings, then you will need a way to get back to the home page, so you will want to create a new menu. Go to the section titled “Menus”, then select “create new menu”, then select “next”, then select “add items”, then select “home” and “sample page”.

If you don’t have a tagline or you have one that isn’t important to you, then you may want to change your navbar style. Go to the Navigation tab then find the “Title Below Nav” control and select “Off”. Notice that your title also serves as a home link.

Colors

A lot of people choose a theme because of its color palette. But with the Big Scene theme you can choose any color palette that you want. So now you can go to Colors section, and start walking down the controls. Suppose you were to make the following selections:

  • Foreground Color: f4f4f4
  • Background Color: 939393
  • Text and Border Color: 000000
  • Title Color: 000000
  • Link Color: dd3333
  • Link Hover Color: e474e8

Now your site looks like this:

As you can imagine, you can spend quite a bit of time experimenting with this section. But before you try too many things, you may want to see how your new colors look with new fonts. Next we’re going to head over to the typography section.

Typography

The Big Scene theme gives you access to the entire free Google fonts library. All you have to do is go to fonts.google.com. Find the ones you like then copy and paste the names into corresponding areas. For example suppose you chose:

  • Title: Neonderthaw
  • Heading: Mochiy Pop P One
  • Paragraph: Source Code Pro
  • Menus and Miscellaneous: Mochiy Pop P One

Your site will now look like this:

Background Image

Now you’re going to want an image. The Big Scene theme is designed so that you can use existing media to build up the look of your site. There’s tons of places where you can get free open source content. Three of my favorite resources are:

Today I’ll be adding this image.

One thing to keep in mind is image size. You’ll want to use an image that is ideally less than 1 MB but large enough that it still looks good on big screens. When you upload an image to WordPress, it will often reduce the size for you. If it doesn’t reduce it enough, you can go to the the main admin page then select Media > Library. Select the image then click “Edit image” and reduce the dimensions.

Finding usable images can sometimes be a tedious process when your new to website building, so it’s not a bad idea to start with an one image site when you are just trying to build a simple website. As you get used to the issues of finding usable images, you will find that the process gets easier and you will be able to build a complex website as easily as you built your simple website.

Once you have your image downloaded to your computer, you can go to the background media section and select the image that you want. Since you’ll only be using one image for the whole site, you will want to find the control that reads “Background Image All Pages” and turn it on.

Then you should evaluate your image. If everything about your image that’s important is focused toward its center, then you’ll probably want to find the “Big Background Image” control and turn it on. If there are important elements toward the edges of your image, then you’ll probably want to leave it off. You want to do this so that your image looks good on any screen size.

Once you’ve done that you’ll probably want to go back to the Colors section and find the three blue opacity range bars. These control how much you can see your image through your foreground colors.

The result should look something like this:

Since you’re only using one image turn the “Background Image All Pages” switch on.

Finishing Touches for a Simple Website

Since you are only using one image, you also want to go to the layout section, then find the “highlight featured media” control and switch it off. This will perform the following change on your site:

Note that the homepage still shows the entire image.

Turning Your Site into A One Page Website

If you don’t have much content, then you may want to consider starting off your website as a one page website. You can learn how in my next post. Otherwise, you can continue reading below.

Wrapping Up Your Simple Website

At this point, generalized advice isn’t very useful. The next section you will probably want to look at is the “Hompage Settings” section. If your site isn’t a blog then you will want to set your homepage so that it displays a static page, then you will want to delete your “hello world” post.

After that you will want to go into your pages and start adding your content.

As you continue to build your site into the future, you may want to start displaying unique featured media for every page. To do this, you will first want to turn the “highlight featured media” control back on and perhaps move the background image to the Homepage Header Media section.

You can learn more about adding featured media to individual pages here.

Once again, if you have any questions, then please post them to the Big Scene forum.

Featured Image Credit

The Simplest Way to Change Your WordPress Theme

Changing your WordPress theme can seem daunting. You may be afraid that if you screw something up, then you won’t be able to fix it. The reality is that changing your WordPress theme is one of the safest and most powerful updates that you can perform because if anything goes wrong you can always just revert back to your old theme. If fear has held you back, then perhaps it is time to change your WordPress theme.

Assumptions

Make sure you understand the basics of building a site before reading this post.

Step 1: Look at Your New Theme and Take Notes Before You Change Your WordPress Theme

The first thing you want to do is open your customizer on your existing theme. Then while leaving your current theme open, you should open up a second window, then open up the customizer, then select “change theme” and open a live preview box.

If you are still in the process of considering what theme to use, then I recommend trying one of the Big Themes.

DON’T push the “Activate and Publish” button. For now, all you want to do is look at your existing theme, then experiment with the controls in your new theme and take notes. You want to write down what changes you will have to make using your new controls. Take your time. The principle of this exercise is to follow the old expression, “Measure twice and cut once.”

Your notes should be detailed enough that when it’s time to make the updates in the customizer, you will be able to do it quickly.

PRO TIP: The customizer isn’t perfect. The customizer is just a representation of how your site is supposed to behave. It doesn’t always behave the way a live site would behave. Some features (like links leading away from the site) simply don’t work in the customizer. Other times, you may notice that you hit a control to make a change and the change doesn’t happen. If this happens try reverting the control back to its original setting, then switch it back again.

Step 2: Reconsider Your Plugins Before You Change Your WordPress Theme

Open up a third window and consider every plugin you have that influences appearance. Does your new theme already provide the needs of the existing plugin? If it does, then you should probably get rid of the plugin.

Do you want to keep your plugin because your theme doesn’t provide the plugin’s option? Is your plugin compatible with your new theme? If not, it may be time to get a new plugin. Better yet, if your new theme doesn’t provide the plugin option, then maybe the latest version of WordPress provides it as an option. Take a look at the latest blocks.

Step 3: Consider Theme Block Extensions Before You Change Your WordPress Theme

Lots of new themes have styling options in the form of block extensions. If yours does then consider what they can do. Unfortunately, there’s no way to experiment with these options without activating your new theme. So unless you have a WordPress site on a local server or a dummy site that is ignored by search engines that you can experiment with, you won’t be able to experiment with these options. If you don’t have either of these test environments set up already, then I wouldn’t try to set one up because it can be pretty complicated.

Step 4: Consider Putting Your Site into Maintenance Mode

If you think that you can set up your new theme using just the customizer, then you may not need maintenance mode. If you think that your page settings are going to benefit greatly from the theme’s block extensions, then consider getting a Maintenance Mode plugin. However, if you think that that the page settings can be updated after the new theme is launched, then you probably don’t need to put your site into maintenance mode.

Step 5: Update to Your New Theme

  1. Put your site into maintenance mode (if necessary).
  2. Restructure plugins (if necessary).
  3. Use your notes to make the updates in your customizer, then Activate and Publish.
  4. Update individual pages (if necessary).
  5. Take your site out of maintenance mode (if necessary).

Hopefully, you noticed that only one step is mandatory. And remember, if anything goes wrong, you can always just activate and publish your old theme.

Questions About Changing Your WordPress Theme?

If you have any questions, then please leave them in the comments area.

The Best FREE WordPress Plugins for Improving Website Loading Speed

Update About Plugins Improving Loading Speed

Since I originally wrote this post, I have written an updated post about improving page load speed. These plugins aren’t bad for improving loading speed, but I am no longer using any of the plugins in this article.

Original Article About Improving Loading Speed

Plugins are a great way to bring your WordPress site loading speed to a crawl. But the right plugins can actually make your site considerably faster. If your site is running slowly, you can speed up its loading time using the following tools.

Before You Use These Plugins

Even if you use the following plugins, you need to understand that the size of your media files and your choice of web host can have a high impact on performance. You should always minimize the size of your media files to the lowest sizes necessary (your file sizes should be able to be measured in kb, not mb); and even if you use a solid web hosting service, if you try to save money using a shared server (like I do), then you’ll find that from time to time your site won’t load as fast as you might like, especially on mobile.

A Caching Plugin for Improving Loading Speed

There are multiple free caching plugin options, and my experience is that they perform about the same. If your web host provides you with a caching plugin, then it is probably Endurance Cache. It is not the most user friendly plugin, but you can learn how to use it here. If you don’t have that available, then I recommend WP Super Cache. The reason I recommend Endurance Cache first is WP Super Cache can become complicated to use because of your individual web host’s server settings.

Jetpack CDN for Improving Loading Speed

Jetpack is a big plugin. In addition to the CDN, it provides a number of cool blocks. But when you’re talking about site speed, you just need to deal with the Jetpack CDN.

What’s a CDN?

A CDN is a Content Delivery Network. When people try to get onto your site, physical distance matters. Jetpack CDN takes some of your biggest files (the images) and tells people that they can get the images from servers closer than your web host’s server. To turn on Jetpack’s CDN, just go to Settings > Performance, then turn everything on. This should include lazy loading which tells the browser to just load the images that can be seen and wait to load the other images when users scroll down to look at them.

Jetpack Boost for Improving Loading Speed

Jetpack Boost is a separate plugin——and free. No. Jetpack isn’t paying me. I just have to admit that their stuff works really well. In fact, I’ve used it on my own software, and I have noticed a big improvement in loading time, especially on mobile. I’m the kind of developer that’s okay with sacrificing a little speed so I can use higher quality media. The Jetpack Boost plugin allows me to have my cake and eat it too. Also, if you like to make custom modifications, this plugin will help offset any speed compromises that you may have made. All you have to do is add the plugin and follow the instructions. It’s pretty straight forward.

Conclusion

That’s it. You don’t need to know the history of the World Wide Web to make these updates. So go make it happen.

How to Add a Table of Contents to Your Sidebar with WordPress

Author’s Note About How to Add a Table of Contents to Your Sidebar

I have also written a more recent article about how add a table of contents to your sidebar.

Original Article About How to Add a Table of Contents to Your Sidebar

You don’t need a plugin to add a table of contents with WordPress. And if you create the table of contents yourself, you won’t have to worry about performing regular plugin updates. And since you’re just adding html and css, your table should have a high probability of long term compatibility. Although the ideal place for a table of contents is a sidebar you can also use this tutorial to add a table of contents using a custom html block in the body of your page.

You should be able to use almost any theme with a sidebar (or without one if you’re putting the table in the body), but an ideal theme has the following attributes:

  • Sticky sidebar
  • Options to add or remove your sidebar
  • Smooth scroll

I’m using the Big Bob theme in this demonstration because it has all of these attributes and it is available for free through WordPress.org. But you also may want to try some of my other themes.

Step 1: Set Your Anchors

As you’re writing your page or post select a block containing a section or section title that you want to point to then add an anchor into the input box titled HTML anchor under the Advanced tab:

Add a Table of Contents to Your Sidebar

Do this for each section that you want in your table. You can name the anchors whatever you want. And it’s a good idea to add a unique prefix like “bb-” that is unlikely to get confused with something written by a plugin or the WordPress core.

Step 2: Open the Customizer and Add a Custom HTML Widget.

Select preview then in the new preview window, select customize from the admin bar at the top of the page.

Once you’re in the customizer, open up your widgets tab then open up your sidebar tab (this assumes that your theme supports sidebar widgets).

Open up a Custom HTML Block and add the following code into the content section:

<div id="bb-Steps">
	<h2>
		Page Contents
	</h2>
	<ol>
		<li><a href="#bb-Step1">Step 1</a></li>
		<li><a href="#bb-Step2">Step 2</a></li>
		<li><a href="#bb-Step3">Step 3</a></li>
		<li><a href="#bb-Step4">Step 4</a></li>
	</ol>
</div>

Don’t add a title. Write everything into the content section. Replace things like “bb-Step1” with your anchors. Replace things like “Step 1” with your section title. Add or remove the number of list elements as necessary and replace “Page Contents” with your title.

Step 3: Add CSS

You will only want to display your table of contents on the page that it is relevant. First, open up the the Additional CSS section of the customizer and add the following code:

#bb-Steps {
	display: none;
}
.widget_custom_html{
	padding: 0;
}

This will make the table disappear.

Next you want the table to only be displayed on the page that it is relevant. First, add the following.

.postid-634 #bb-Steps {
	display: block;
}
.postid-634 #bb-Steps a:focus{
	outline: none;
	text-decoration: underline;
}
.postid-634 .widget_custom_html{
	padding: 5px;
}
.postid-634 #bb-Steps li{
	font-size: 25px;
	margin-left 2px;
}
.postid-634 #bb-Steps li a {
	margin-left: 10px;
}
.postid-634 #bb-Steps h2{
	font-size: 30px;
}
.postid-634 #bb-Steps ol {
	list-style-type:none;
}

You’ll need to adjust your code so that it is specific to your page. You’ll want to replace where it reads “.postid-634”.

Go back to your block editor page and look at the end of your address bar and find something like the following:

post=634&action=edit

Go back to the Additional CSS section in the customizer and replace the 634 with whatever your number reads, and if you are editing a page instead of a post, then replace “postid” with “page-id”.

Make sure it looks good in your customizer, and if it does, then you should be ready to publish.

Image Credit

Questions About How to Add a Table of Contents to Your Sidebar?

If you have any questions, then please post them in the comments section.