Updating Colors and Fonts on Your WordPress Site

After content, colors and fonts have the highest impact on the look of your website. But you have probably noticed that updating your colors and fonts on your WordPress site is not as intuitive as you would like it to be. However, when you find the right tools, updating your colors and fonts on your WordPress site isn’t that difficult. The hardest part is finding the tools. This tutorial will show you how to obtain all of the tools you need to update your colors and fonts, and it will show you the most efficient way to update your colors and fonts once you have found those tools.

Picking the Right Theme

Not every theme makes updating colors and fonts on your WordPress site possible. And using plugins to update colors and fonts is usually convoluted.

Your theme is the thing that has the highest impact on how your colors and fonts are set. The whole reason that themes were created was to create a foundational mechanism for determining how your site looks. This is the reason that your theme ought to be the thing that determines your font and colors.

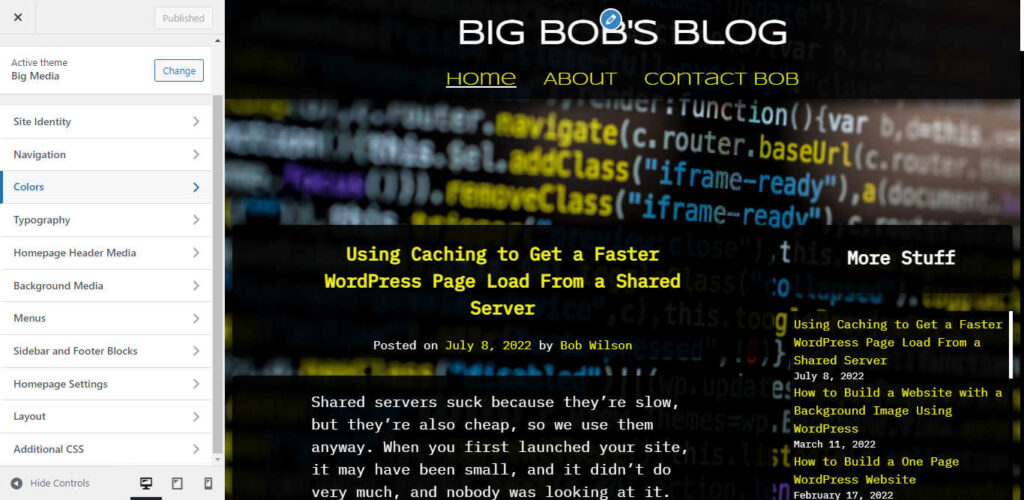
Most themes give you little control over your colors and fonts. But a few themes will give you a wide spectrum of choices. One such theme is the Big Media theme. The Big Media theme is a free theme and you can download it directly from your WordPress admin center by selecting Appearance > Themes > Add New. Then type “Big Media” into the search box.

Screenshot of the Big Media Customizer

Picking Your Page Layout Style and Foundational Content

Now that you have a great theme, you need to consider your layout and content before updating colors and fonts on your WordPress site.

You should ask yourself if you want your site to be page driven, blog driven, or a combination of both. In other words, do you want to build your site with pages, posts, or both? If your site is blog driven or blog supported, then I would suggest considering a background image, especially if you are using the Big Media theme. You can add a background image in the “Background Media” section of the customizer.

If you are using the Big Media theme and you like the blog look, but you don’t actually want to have all of the blog features that go with it, then you can go into the Layout section of the Customizer and switch the “Big Pages” control to off. When you do this, it will create more background space for a background image when you build your WordPress site with pages.

If you’re sure you don’t want a background image and you are using the Big Media theme, then you should also consider a homepage header image. You can add this in the “Homepage Header Media” section of the customizer.

The Best Way to add a Background Image or a Header Image

Don’t worry about whether your image is appropriate to the theme’s default colors and fonts. Just focus on finding an image that you think looks great and facilitates your site’s message. You’ll be able to manipulate your theme to fit your content later.

If you want your image to be a background image, then it will need a lot of versatility. A great background image is an image where you only need to see a little bit of the image for it to be valuable. If you have an image that you like that doesn’t work well as a background image, then consider using it as a homepage header image.

If you want to add a homepage header image, then you should make sure that the image looks good on any screen dimension. Try setting the “Big Header Image” control in the “Homepage Header Media” section to both on and off and see how it looks on different screen sizes.

If you don’t have your own image that serves this purpose, then you can get tons of great images using the following links:

You probably want to load the original copy of your image onto your WordPress site to see how it looks. If you have trouble loading your image, then you can use GIMP to compress its size:

Images can crush your loading time. WordPress has features that automatically reduce the size of your images, but sometimes they don’t work, and even when they do, the image byte size can be larger than necessary.

Background images need to have a larger than average file size, but I have found that you can keep them looking good at pretty small sizes. I find that I can keep a background image looking good at an average size of 500KB and an average width of 2560px.

GIMP is free software that you can use to amplify compression and convert file types.

GIMP is a beast and is not the most user friendly. It is a full service image editor that has capabilities that extend well beyond what you will probably need for WordPress. However, if you are just using it to compress your images, then it isn’t that difficult to use. Just follow these instructions:

  1. In Gimp, go to File > Open, then choose the file you want to open. Gimp can be slow.
  2. Go to Image > Scale Image. Then reduce the width to 2560. You may be able to reduce this even further if you set the “Big Header Image” control to off in the “Homepage Header Media” section of the customizer.
  3. Go to File > Export As
  4. If the file type reads .png then delete the .png and replace it with .jpg. You may also want to rename the file.
  5. Click export, then lower the image quality to 50 percent or whatever value you think is best. You can check the box that reads “Show preview in image window”, and it will tell you what the file size will be.
  6. Click Export.

Picking Your Colors

If you are using the Big Media theme, then you can update your colors in the colors section of the customizer.

Colors should be defined by content. This is why it is best to choose foundational media before you choose your colors, then use the media as a basis for color selection.

Basic colors can be a great choice. The best way to start the color experimentation process is by selecting from the eight basic color squares. If you don’t like the default look, then a good second foundation is to try a black foreground with white text. Black foregrounds also tend to do a better job of revealing images when you reduce foreground opacity.

If you decide to experiment beyond the eight basic colors, then keep in mind that some colors look different on mobile, so you’ll want to test for that by viewing your site on mobile technology.

Don’t pick more colors than you need. The Big Media theme has a lot of color options, but that doesn’t mean that you can’t use the same color more than once.

Pick Your Fonts

If you are using the Big Media theme, then you can add fonts in the Typography section of the customizer.

Colors can affect how your fonts look, so you want to make sure that you pick your colors first.

Try lots of fonts. The Big Media theme gives you access to the entire Google fonts library, so be patient and keep trying fonts until you get exactly what is right for you. But keep in mind that it’s okay to just use one or two fonts. Some fonts look good by themselves, but they don’t always look good juxtaposed against other good looking fonts.

You may also notice that some fonts fit better than others, so you may have to update menu font sizes. You can do this with the “Menu Size” control in the Navigation section of the customizer.

You may find that your default fonts don’t always look ideal in every place that they have been set. But you can use the Additional CSS section of the customizer to refine font selection. For example, this theme added the following update:

.entry-meta,
.entry-footer,
.nav-links,
.comment-metadata,
.reply{
	font-family: "IBM Plex Mono";
}

You can figure out which class names that you would want to update using this tutorial.

Got Questions About Updating Colors and Fonts on Your WordPress Site?

If you have any questions then feel free to post them below.

Using Caching to Get a Faster WordPress Page Load From a Shared Server

Caching with a shared server can be complicated, but it is worth the effort. Shared servers suck because they’re slow, but they’re also cheap, so we use them anyway. When you first launched your site, it may have been small, and it didn’t do very much, and nobody was looking at it. And if the site’s foundation was simple HTML (not PHP), then it probably loaded pretty quickly, even if it was running on a shared server. But if your site got more popular and complicated, then you may have noticed your pages started loading slower and slower.

If this is your situation, then you’ve reached a line of demarcation, where you have to change how you manage your site. You may be able to resolve the problem by switching to a cloud server or a dedicated server. However, this will likely cost you money, and it will probably be complicated. However, you can also upgrade your caching which has varying degrees of complexity, but it’s something that you can do for free.

The Easiest Way to Read this Article

There is no TL;DR for this article. It’s long and so is following all of its instructions. It’s probably not realistic for you to deal with all of this in one sitting. But if you try to learn and implement a little at a time, then you may be able to substantially improve the performance of your website. So bookmark this page, and block off some regular time each week to pick your way through it.

This Article is Primarily About WordPress

Although the principles discussed in this article can be applied to any website, in order to implement all of the instruments discussed in this article, you will need to be running a WordPress website.

How Much Do You Need to Depend on Your Host Server?

This article assumes that a shared server is appropriate for your website. If you are using a shared server, then you should not be running a site that requires frequent content updates. For example, running an e-commerce site on a shared server is a bad idea. Any site that requires frequent updates from the host, especially partial page updates, needs a higher quality server. However, if your site is viewed from a static state, and requires infrequent updates, and doesn’t get too much traffic, then a shared server should be fine.

Things that Cause a Slow Page Load Time

Web page speed is complicated. And it’s easy to blame the wrong culprit. Here are four of the biggest causes of slow page speed:

  1. Size of the files being downloaded to the browser.
  2. Server processing time.
  3. Physical distance of the page caller from the host.
  4. Unnecessarily redundant page calls.

Dealing with File Size: Pick a WordPress Theme with Fast Loading Potential

There’s no such thing as an inherently fast WordPress theme. Any theme that claims that it is inherently faster because it is lightweight by virtue of total byte size is misleading you. While it is true that a theme with a lower total byte size allows for a greater margin of error while still producing a relatively fast page load time, it is not true that a theme with a larger total byte size is inherently slower. On the contrary, if the theme is used properly, it could load even faster than the theme with the smaller total byte size because the individual pages being loaded are smaller. And themes with relatively larger byte sizes often have more features. And poorly implemented low byte sized themes will still load badly. However, this is not meant to imply that byte size bloat in themes should not be a concern.

Having said all that, it can be quite difficult to determine what WordPress themes have a fast loading potential, especially if you can not make a quick assessment based on file size. At the risk of performing a shameless plug, I can tell you that all of my Big Series Themes can load pretty fast when implemented properly, and this article will tell you almost everything you need to know about proper implementation. If you are not sure which theme to pick, then I recommend my Big Media theme. All of the themes are free. And you can download them directly from your WordPress admin center. If you have any questions about any of these themes, then feel free to post them to my forum.

Other File Size Considerations Before Caching with a Shared Server

The size of every file that you load to a person’s browser impacts the loading speed. You need to pay attention to the file size of everything that you add to your site from plugins to images. You want to keep every file you have as small possible when it loads to your user’s browser (as opposed to when it is running in your admin center).

Slow Server Processing Time: Caching is the Primary Remedy for a Slow Shared Server

If you are trying to load your site from a shared server, then you are trying to load it at a disadvantage because you have to compete for processing power with the other people that you are sharing a server with. The key to overcoming a slow loading shared server is caching. There are three places that you can capitalize on caching:

The Three Caching Points when Caching with a Shared Server

This tutorial will teach you how to manage the three major caching points:

  1. Your host’s server’s local cache.
  2. The cache of your content delivery network.
  3. The cache in your user’s browser.

Don’t Cache the Same Cache Type when Caching with a Shared Server

You might be tempted to believe that if one cache speeds up your site, then two will make it even faster. After all, isn’t this tutorial trying to teach you how to set up three different caches? That’s true, but that doesn’t mean that there is an advantage to redundant caching. The thing you need to realize is sometimes your cache will be empty. So you will have to route the request all the way to the origin.

Suppose you have two caches and both of them are empty. If they are both of the same cache type, then if one is empty, the other is probably empty too. So if someone makes a call for one of your webpages, then you have increased the amount of time that it takes for your site to load because it takes longer for the page call to reach the origin because you are requiring the call to check two caches instead of one. Also, if one of your caches only has some of the files that are necessary, then the other cache will also probably have the same files, and once again the call will create unnecessary file read time. The bottom line is you only want to use one product for your local cache, and one product for your CDN, and you want to set only one set of rules for your user’s browser’s cache rules.

Reduce Your Server Processing Time: Caching Your PHP

Server speed matters, and shared servers are slow. I don’t want to be misleading about that. But even if you have a slow server, if you can give it less to process when a user makes a call for one of your pages, then you can improve its speed. One of the simplest and most important caching steps that you can take is caching your PHP pages on your host server. There are a number of plugins that provide local caching. Some of them are good. Some of them are bad. And a lot of them are complicated. So I’m going to try to help you find an effective path that isn’t too complicated.

UPDATE (October 2023): PHP Caching and the Latest Versions of WordPress and PHP

The speed of PHP and WordPress has improved quite a bit since this article was originally published, and using page caching to support it has become a thing of of more questionable efficacy.

Dealing with the Endurance Cache when Caching with a Shared Server

If you are using a shared server, then there is a good chance that you have had the endurance cache imposed upon you. I’ve used it in the past, but I no longer recommend it. Its documentation is nearly nonexistent and its performance is inconsistent. Fortunately, turning it off so that you can use a different local cache plugin is pretty easy. Just go to your admin page and click on where it says “caching” at the top of the page, then select “cache settings” from the dropdown. Scroll down to the bottom of the page and set the Cache Level dropdown to “Off (Level 0)”.

Next, you’ll want a local PHP page cache that works well and is easy to install. I recommend Surge. All you have to do is go to Plugins > “Add new”. Then type “Surge” into the search field, then install it, then activate it. That’s it. You don’t have to do anything else. Pretty nice, huh? I’ve been using Surge for awhile, and every performance measure I can think of seems to show that it’s working well.

Reduce the Physical Distance of the Page Call: Caching to a CDN

A CDN is a content delivery network. A CDN moves copies of your site all over the world so that it is physically closer to whomever is asking for it. This places less demand on your host server, and requires less time for a call to move the requested files because the distance is shorter, thus making it reach the caller’s computer faster.

CDN Options: Jetpack versus Cloudflare

Jetpack is a huge WordPress plugin series that has all kinds of features, including those that improve page load speed. Cloudflare is primarily a content delivery network that is all about helping your pages load faster.

Jetpack is easy to install, and Cloudflare can be a bit tricky, but Cloudflare is substantially more effective.

If you want to try out Jetpack, it’s pretty easy to try. Hypothetically, Cloudflare is compatible with Jetpack, but my experience is the two don’t seem to play well together. Even when I have turned off the features of Jetpack that are redundant to Cloudflare, I still find that there are problems with Jetpack. In particular, I find that there are problems when I update Jetpack. Since I don’t really get much out of Jetpack when I’m using Cloudflare, and I’m sick of troubleshooting, I’ve decided to remove Jetpack from all of my sites. I’m not saying that you necessarily need to do that for your site. But you need to take responsibility for your choice.

Setting Up Cloudflare when Caching with a Shared Server

Okay. This is where we separate the big kids from the little kids. Unfortunately, the instructions that you need to set up Cloudflare will vary depending on which webhost you use, so you’re going to have to look up your instructions on your own. All I can do is give you a little general advice: Measure twice and cut once. If you make a mistake, it can mess up your site, so be careful. It’s time to see how DIY you really are. Hopefully, I’ll see you on the other side.

The Other Side: Controlling CDN Cache Time

Did you make it? Did you set up Cloudflare? Are you reading this before you even tried? You shouldn’t be. The rest of this tutorial will be useless to you until you’ve set up Cloudflare. Don’t be a wimp. You can do it. If you mess up, then try again.

Okay. Did you really actually honestly set up Cloudflare? Well then, great job! I’m proud of you.

Next, you’re going to want to maximize the amount of time that your files spend in the Cloudflare CDN cache. Cloudflare has a thing known as page rules. These rules can be used for all kinds of purposes. But you’re going to need to use one in particular to encourage Cloudflare to keep your files in its CDN cache for as long as possible. In the Cloudflare admin, select your domain then find the page rules section and enter the following rule (obviously, you should update for your own domain):

UPDATE (5/31/24): Cloudflare page rules are deprecated. You should use cache rules instead.

Caching with a Shared Server

Avoid Unnecessary Page Calls: Controlling Browser Cache Length

UPDATE (5/31/24): Since this post was originally published, Cloudflare has created cache rules. They are a better way to manage browser caching.

Did you know that you can tell a browser how long you want it to cache your site? It’s true. And they will usually do what you tell them to. But to be clear, they don’t have to, especially if their users tell them not to. But most of the time that doesn’t happen, so it works out. All you have to do is select your domain then go to Caching > Configuration, and make the following selection:

Caching with a Shared Server

Caching HTML to a CDN when Caching with a Shared Server

UPDATE (5/31/24): The Super Page Cache for Cloudflare plugin still works. But it has become more complicated to use, since the deprecation of page rules. And the improvement of performance of PHP and WordPress has made its performance far more trivial in value.

Cloudflare doesn’t cache your html But there’s a free plugin called Super Page Cache for Cloudflare. If you follow the instructions, you should find that it isn’t too difficult to set up if you already know how to set up Cloudflare. The thing that you need to understand is that when you load the plugin, you need to use at least one of your page rules, and the number of page rules that you have available will limit how many WordPress sites you can add to a domain. The plugin will add your new site page rules for you. But you will probably need to reset your Edge Cache TTL when you set it up (and sometimes when you update the plugin), and you will have to make sure that your new page rules are in the proper order as follows:

Caching with a Shared Server

Make sure “Cache Everything” rules are at the top. If you don’t put the page rules in the proper order, then the HTML will not cache properly.

Browser Caching when using Super Page Cache for Cloudflare

If you decide to add the super page cache plugin, then you will want to go back to the Browser Cache TTL referenced above and set it to “Respect Existing Headers”. Then go into the Super Page Cache admin panel, then select the Cache tab, then go all the way to the bottom of the page and set the “Add browser caching rules for static assets” switch to yes.

Conclusion

Hopefully, you’ve enjoyed your DIY caching experience. And if you didn’t, hopefully you’re at least enjoying the results. But even if you have merely improved, and you still think your site should be faster, think of how fast your site will be once you can take everything that you have just learned to a higher quality server.

Image Attribution

How to Build a Website with a Background Image Using WordPress

Most people that try to build a website using a background image start with high hopes then wonder why they don’t see more websites using background images. They try for awhile. They run into some problems that they think that they can overcome. But from creating readable text to making the background image mobile compatible, the problems start to become overwhelming. Eventually most people realize that they are in over their heads, and they give up. There’s no shame in this. Setting up a site with a background image is hard. Fortunately, I have simple solution to these problems.

TL;DR

If you use WordPress, then you’re in luck. All the tools you need to build a site with a versatile background image are already available to you for free. Everything that’s complicated about setting up a site with a background image has been taken care of for you. All you need to do to get started is download the Big Breeze theme.

Assumptions

This tutorial assumes that you already have a webhost and know how to set up WordPress. If you don’t know how to do these things, then bookmark this page and go look it up.

Getting Started:
Adding the Big Breeze Theme

Once you have your WordPress site set up, go to the admin dashboard then go to Appearance > Themes, then click the “Add New” button, then type “Big Breeze” into the search bar. Next, go to Appearance > Customize. Click the “Change” button in the “Previewing theme” box. Find the “Big Breeze” theme and click the “Live Preview” button.

Adding Your Background Image

Next click on the “Background Media” tab, then click the “Select image” button, then select the “Upload Files” button and upload your image. If you don’t have an image, there are tons of free open source images available. Two of my favorite sources are:

The Rest of the Big Breeze Theme

The Big Breeze theme has options that extend well beyond the scope of this post. To learn more, you can check out its demo website.

If You Have Trouble Uploading Your Background Image

WordPress takes the legwork out of compression. It’s important that your file is compressed to a reasonable size. When you upload your image, WordPress usually does this automatically if your image is large. But on occasion, it struggles. When it does, it is usually because of how php is configured on your server. You’ll have to look up how your web host gives you access to your php.ini files. There will probably be a tool in your dashboard. How you access it will vary from host to host. Once you have found it, you will probably find that you can upload the images you want with the following values:

  • max_execution_time = 360
  • max_input_time = 360
  • max_input_vars = 4000
  • memory_limit = 1024M
  • post_max_size = 1024M
  • upload_max_filesize = 1024M

Once you have done this, you will probably find that you can compress large images without any problem. You can tell the image has been compressed because the file size will be smaller, and it will usually have the word “scaled” added to the file title. If you are still having trouble compressing the images, then you may want to make the above values a little higher.

If updating your php.ini file is more than you want to deal with, then you can also elect to load a smaller version of your image or a different image. However, I would encourage you to try to learn how to update your php.ini file on your webhost because you will probably find that updating it will allow you to upload all of your website’s images more liberally, and updating the values will probably also generally improve site performance and content management.

Caveat for Background Images

There is one thing that you should realize about websites with background images. They do tend to load a little slower than websites without background images. All images reduce loading speed. But it’s important to realize that a lot of what people think users purportedly expect for site speed is driven by fear mongering bloggers that know that controversy equals clicks. However, if you take a look at more objective data, you’ll see that user expectations are actually a lot more modest than some people might lead you to believe. And if you don’t believe me, then consider this: Was this the fastest loading website you’ve been on today? No? Are you still reading my post anyway?

When you get hung up on what you think you’re supposed to do, then you can deny your creative potential and the things that people would want if they were available.

Ways to Improve Site Speed when Using a Background Image

You may find that your site loads just fine without any help. Oftentimes, if you are willing to pay for a premium webhost (or just a quality host at a quality price), you’ll find that they have taken care of everything for you. However, you may decide that you would like your site to load faster. There are several tools that you can use. I recommend the following support software. These tools are ordered based on a combination of ease of use and impact of performance. All of the software is free or has a meaningful free version. I would recommend this support software for any WordPress site, regardless of what theme you choose or whether or not you choose to use a background image.

Surge Caching Plugin

Surge is one of the newest caching plugins on the market. It is easy to use and every measure of performance that I have tried gives me the impression that it works. The only caveat is if your web host adds a must use caching plugin like the Endurance cache, then you may have to deal with conflicts.

Jetpack Boost

Jetpack Boost is also simple and effective. The only caveat is if you use it with the Big Breeze theme, it will disrupt the performance of the preloader if you decide to turn it on.

Jetpack Site Accelerator

Jetpack Site Accelerator is a feature within Jetpack. Note that Jetpack and Jetpack Boost are two different plugins. The site accelerator uses a CDN on some of your files, and it makes adjustments to your images to improve performance. Jetpack has its critics. It is a fairly large plugin. And some people don’t believe that the bloat it adds makes up for the performance enhancements that it provides. You should try it out for yourself and see how it performs. It isn’t that difficult to use.

Cloudflare

Cloudflare provides a more comprehensive CDN than Jetpack Site Acceleraor. It is also the most difficult of the performance enhancers to set up. If you got freaked out by updating the php.ini file, then you might want to stay away from Cloudflare. You’ll need to set up an account. And you’ll need to set up a plugin. This will require that you make changes on your webhost. And if you make a mistake, it can break your site. Look for and pay close attention to instructions regarding your security certificates. If you use Cloudflare, then you may find that it doesn’t work well with Jetpack Site Accelerator. Using redundant CDN’s can actually slow down loading speed.

GIMP

Images can crush your loading time. If you have a webpage that is loading slow, and you have images on it, one of the things to check is the file sizes of your images. If you have a page with a lot of images on it, getting your loading time down to a reasonable speed can be tricky.

Keeping your total image file sizes per page under 1MB is ideal. If you can get the total even lower, then it might help. But don’t be dogmatic. If it is above 1MB, then that’s fine, as long as you’re satisfied with your site’s loading speed.

WordPress does a pretty good job of compressing images right out of the box. If you only use a couple of images then you probably won’t have to do anything. WordPress also converts each image into four different image sizes to serve different screen sizes. So if you use WordPress to set your image sizes so that they are just large enough to fit the largest screen that they need to fit on, then you can get your file sizes even lower.

However, if you use a lot of images on one page and you use images types with large file sizes (like .png files), then you might find that WordPress does not provide enough compression support. GIMP is free software that you can use to amplify compression and convert file types.

GIMP is a beast and not the most user friendly. It is a full service image editor that has capabilities that extend well beyond what you will probably need for WordPress. However, if you need to compress your images more than WordPress provides, or you need to change the file type so it has a smaller file size, then you can follow these instructions:

  1. In Gimp, go to File > Open, then choose the file you want to open. Gimp can be slow.
  2. Go to File > Export As
  3. If the file type reads .png then delete the .png and replace it with .jpg. You may also want to rename the file.
  4. Click export, then lower the image quality to 50 percent or whatever value you think is best. You can check the box that reads “Show preview in image window”, and it will tell you what the file size will be.
  5. Click Export.

Assessing the Performance of Your Background Image on Your Site

You should expect your site’s loading performance to be inconsistent. That’s normal for any site. Generally speaking, the more discounted your webhost, the more inconsistent you should expect your site’s loading times. Shared servers are more inconsistent than dedicated servers. Sites on cheaper webhost’s will generally reap greater benefits from support software than premium hosts. So the more you know how to do it yourself, and the more modest you keep your performance requirements, the more you can get away with using a cheaper webhost. You should evaluate your site’s median performance. Don’t evaluate it when it is running at its fastest or slowest.

Conclusion

If you want to build a website with a background image, then you don’t have anything holding you back anymore. You have everything that you need to know and more. Go out there and build your site.

Question About Adding a Background Image

If you have any questions about adding a background image, then please post them in the comments area.