Posts

Website Testing Tools

Website testing tools need to be efficient. And they need to be comprehensive. An inexperienced website developer is likely to overcome key considerations. And even the most experienced developers are likely to overlook edge cases.

The Big Picture of Web Development Testing

A standard software test suite usually runs a series of command line level tests that require specific results produced within a specific environment. But testing websites can be a bit more tedious than testing other kinds of software. Website testing is more difficult to automate, especially on the front end. Testing the look of a website requires a lot of visual inspection and subjective interpretations.

Websites are operated within a wide range of environments. They are run using a variety of browsers run on a variety of operating systems run on a variety of hardware. And every one of these combinations has the potential to make a unique interpretation.

You also need to consider the standard of subjectivity used to determine what is good. And this standard contests with technological feasibility. Your website will be able to do some things in certain environments that it won’t be able to do in others.

Website Testing Tools: The Different Kinds of Environments That You Will Need to Test For

There are a number of different kinds of computers that will run your website. The four that you should be primarily concerned with are Macs, PCs, iPhones, and Androids.

Each piece of hardware has a different operating system. Macs run the MacOS. iPhones and iPads run iOS. Androids run the Android OS. And PCs usually run either Linux or Windows. Theres are also more obscure hardware/OS combinations.

If that wasn’t complicated enough, all of these environments are capable of running a number of different browsers. These include but are not limited to Chrome, Safari, Firefox, DuckDuckGo, and Opera.

And every combination can have its own quirks. Speaking broadly, laptops and desktops are the most consistent, and mobile systems are the most quirky.

And there is no one size fits all method for developing a website that will satisfy with certainty the needs of every environment. So how are you supposed to manage all of this?

Website Testing Tools: Choosing a Computer

An ideal computer allows you to create a test suite that runs your website across every potential environment. Since the ideal computer doesn’t actually exist, you want a computer that comes as close as possible to the ideal.

I would suggest using the MacBook Pro. You can get an awful lot of testing done with a PC, but it simply isn’t as comprehensive as a MacBook Pro. I’m not an Apple salesman; Apple isn’t paying me anything; and I haven’t always liked Apple. But my opinion is (as of the publication of this post) the MacBook Pro is the way to go.

You can buy a MacBook Pro used and get a pretty competitive price. They’re powerful, they travel well, and you can set up software on it that you can test for the overwhelming majority of use cases. And if you’re a developer, the MacBook Pro allows you to set up an excellent development environment.

This wasn’t always my opinion in the past. And it may not be my opinion in the future. But it’s my opinion right now. However, if you don’t already own a MacBook Pro, and you already own a PC, don’t worry, just keep reading.

Website Testing Tools: Understanding the Reliability of Testing Software

Not all emulations yield the same level of accuracy. It is not enough to simply test your website on a variety of different screen sizes. Years ago, I discussed how to use your browser’s developer tools. If you are familiar with those tools, then you know they allow you to look at different screen sizes, including those defined by different mobile environments. However, these tools are an inadequate testing resource.

Browser developer tools are pretty reliable for testing on screen sizes larger than a laptop. But their efficacy is much more questionable for testing mobile environments. Browser development tools don’t account for the distinctions in interpretation of a mobile environment’s hardware and operating system. They merely account for the distinction in screen size.

You need testing software that produces emulation in as exacting a manner as feasible. Nothing can absolutely replace the literal hardware. But if the emulator can make all of the same interpretations of the hardware and its supporting operating system, then the remaining distinctions between the emulator and the literal software ought to be easy to account for.

Website Testing Tools: Choosing Testing Software

Choosing an accurate emulator is crucial to testing success.

XCode is software that develops and tests all Apple platforms. Bu you don’t actually need to use the development services to test your site. XCode has companion software known as Simulator. You can use Simulaor to test your websites on Apple mobile environments.

Website Testing Tools:  Mobile Emulators
Click on the image to see a video presentation of the mobile emulators

Android Studio can be used on both Macs and PCs. You can use Android Studio to test Android phones. Android Studio is a bit less intuitive than XCode Simulator. If you have a literal Android phone, then you may find that testing on the literal hardware is more efficient.

I’m not going to get too deep into the weeds showing you how to actually use the software. There are already a lot great tutorials out there. If those tutorials are inadequate, then I recommend hiring a pro to test your website for you.

Website Testing Tools: Testing on Literal Hardware

One of the biggest problems with testing on emulators is that page load performance is usually superior through the emulator. The distinction in page load time may be trivial or significant. This distinction may occur regardless of whether or not you are loading from your local host or your web host.

If you are using a PC, then it may be difficult to find emulators for Apple hardware. Hopefully you have access to at least one piece of literal hardware that utilizes an iOS operating system.

Purchasing hardware exclusively for the sake of testing is an expensive investment. So you never want to throw out old hardware. It is good to test your website on old environments. If your websites runs well in an old environment, it usually will run better in a newer environment.

There is also no rule against relying on friends and family. If you know somebody that you can borrow from, take advantage of that. If somebody is planning on throwing something out that you can use, then ask if you can have it.

Website Testing Tools: PCs Versus Macs

There are some slight differences between PCs and Macs. Ideally, you should test on both. The most obvious distinction will be the website scrollbar. But in the overwhelming majority of use cases, you are unlikely to notice a difference. You are much more likely to notice a difference when testing on different laptop and desktop browsers.

How Do You Know What to Look For?

The best way to discover discrepancies is to test your website every time you make a significant change. Focus on looking at what you’ve changed in as many different environments as you can.

The process will probably feel tedious. Most of the time, you won’t find any issues. But with experience, you will learn to test more efficiently.

Managing Testing When Making Updates

It isn’t practical to test every conceivable scenario every time you make an update. When you make small changes, you should test on a laptop or desktop and on a mobile environment. After you have made all of the changes you need to make, and before you publish, you should go through the more exhaustive list of browsing environments.

Extreme Edge Cases

You’ll never catch everything. You may run a website for years without noticing a quirk or bug that requires a very particular set of circumstances to trigger.

Rely on your visitors to give you feedback. Make it easy for them to get in touch with you. And don’t beat yourself up if you noticed something that must have been a problem for a long time. If it took you a long time to notice the problem, it is unlikely that many other people noticed it.

Updates Should Be Ongoing

Perfection is the enemy of progress. Websites are inherently dynamic. If you focus on regular improvement, then your website should generally outperform its competitors.

Questions?

If you have any questions, then please leave them in the comment section below.

Cloudflare Fonts: How to Localize the Google Fonts CDN

Cloudflare fonts allows you to localize your fonts from the Google Fonts CDN. I wrote about the distinction in performance between Cloudflare’s CDN and Google’s CDN in a previous post. I also wrote a post that explained how to localize your fonts using a WordPress plugin. However, this method isn’t the most expedient method. But now there is an automated way to get Cloudflare to host fonts if the Google CDN is hosting your fonts.

Cloudflare Fonts and the Big Themes

If you use a WordPress theme like one of the Big Themes, then you can quickly add and drop new fonts. The Big Themes make it easy for you to add and drop fonts in the customizer. They rely on the Google Fonts CDN to do this. If you already have Cloudflare set up, then all you have to do is follow Cloudlflare’s instructions to set up Cloudflare fonts. It requires a simple one click operation. The result is the fastest possible page load time with enhanced visitor privacy. And if you want to update your fonts in the future, then you can change them quickly with the Big Themes customizer.

Efficacy

The bottom line is it works. The process can be verified using browser development tools. You can see the HTML lines calling Google Fonts have been removed. The process can also be verified using Google Page Speed Insights. Speed Insights does not list any calls to Google Fonts as a render blocking resource when Cloudflare fonts is turned on. The effect seems to be the same as the original page speed analysis from my previous post.

Is It Safe to Use Cloudflare Fonts?

Although Cloudflare Fonts is technically in its Beta stage (as of the original publication of this post), it seems to work quite well. Using it will save a lot of time and effort. And it will make updating your fonts a much easier process.

If you have already manually set up a local font host, there is no reason to update. The performance of both methods does not seem to show any distinction. However, if you want to to update your fonts, like with the Big Themes, then you no longer need to consider a manual localization set up process.

Questions?

Do you have questions about how to localize the Google Fonts CDN with Cloudflare? Feel free to leave them in the comment area below.

Linktree to a Website: Switching from Linktree to Your First Website

screenshot

Going from Linktree to a website may seem daunting. If you’re a freelancer, small business owner, entrepreneur, or solopreneur, then you may have built a solid social media presence, and you may still be using linktree as your pseudo-homepage. But if you want to take your business to the next level, then it may be time to start your own website.

Linktree to a Website: Why Bother?

When you own your own website, you have full control over what content you want distributed, and how you want people to see it. You can use social media. But you’re limited to the audience on your platform, and your competition is right up next to you. When you have your own website, your audience is the entire internet. And once people are on your website, they are looking at you, not your competitors.

Linktree to a Website: Take Your Time

Bookmark this page. You don’t have to build your website in a single sitting.

Linktree to a Website: Pick a Web Host

One of the simplest and cheapest ways to set up a website is to set up WordPress on a shared server through a web host that uses CPanel and Softaculous, then follow these instructions. Hostgator is one service provider that uses these services, but there are also others.

Linktree to a Website: Install the Big Chill Theme

Once you have WordPress set up, you can download the Big Chill theme directly through the admin center. Don’t worry about the default colors or the default fonts or even the default layout. You can change all of that. From your WordPress admin center just go to go to Appearance > Themes > “Add New”, then type “Big Chill” into the search bar, then select install, then select activate.

Set Up the Customizer Part 1

Before you add your content, you want to set up the basic layout of the Customizer. From the admin page left sidebar go to Appearance > Customize.

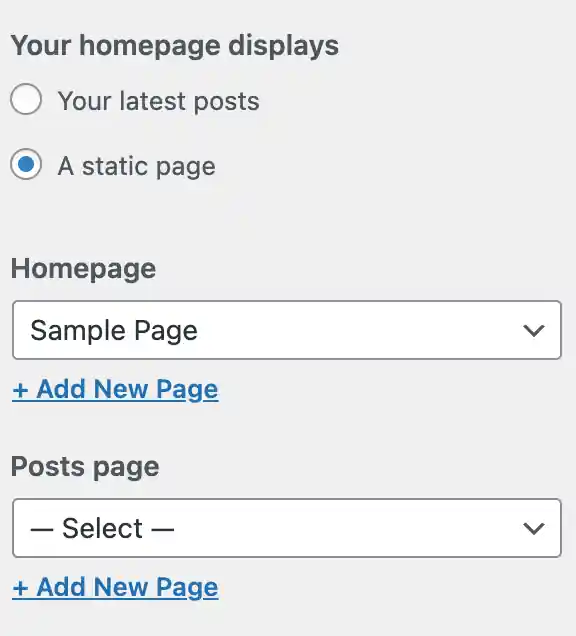
In Part 1 of setting up the customizer, we’re going to just get the layout correct. The first thing that you want to do is go to Homepage Settings. Then select “A static page”, then under the Homepage dropdown select “Sample Page”

Linktree to a Website screenshot
Result of Update

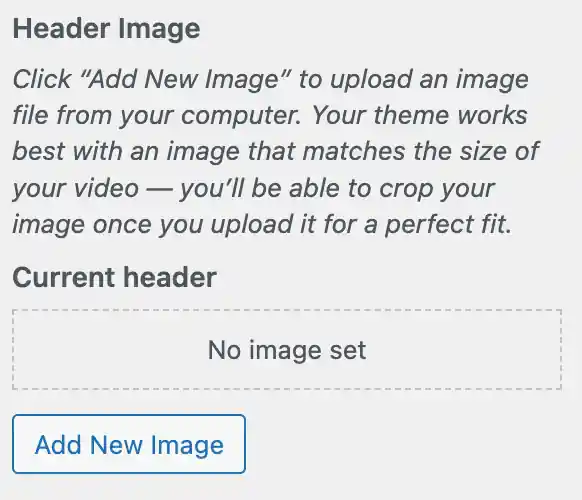
Then you’re going to want to go to back out of that section and into the “Homepage Header Image” section. Scroll to the bottom and under “Current header” click “Hide Image”. The sample content should move up the screen.

screenshot
Result of Update

Next, you won’t need the navbar. So go into the Additional CSS section of the customizer and add the following code:

#site-navigation {
	display: none;
}

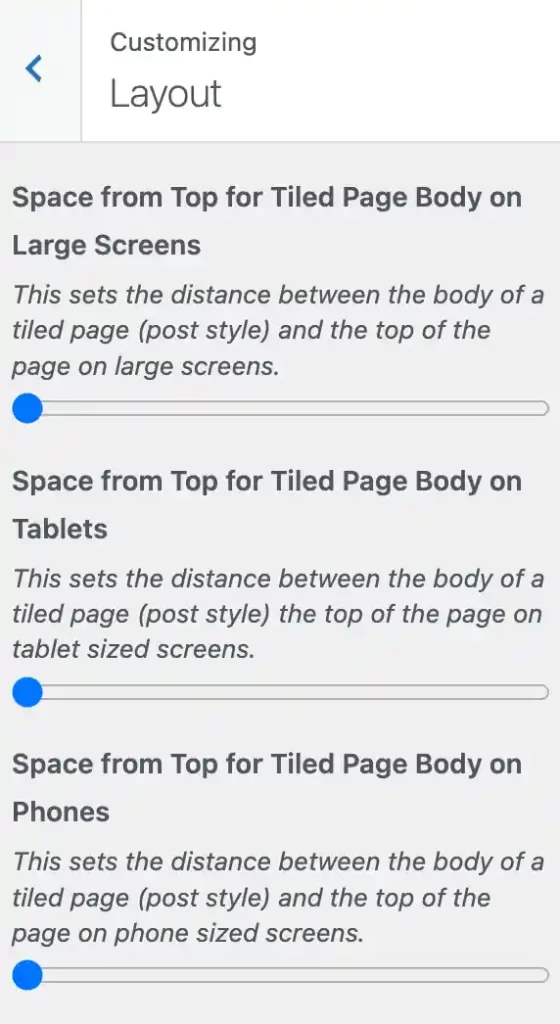
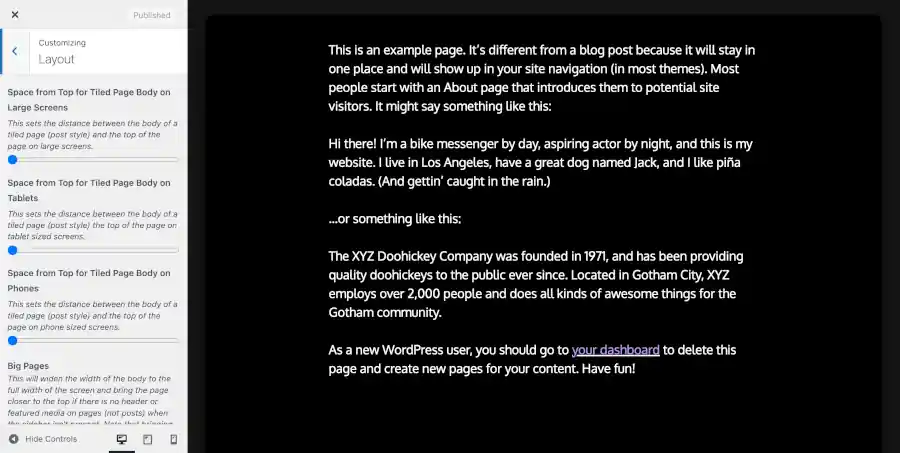
Finally, go to the Layout section and move the first three “Space from Top” options all the way to the left.

Linktree to a Website screenshot

You should have a result similar to the following:

screenshot

Now you can push publish and close out of the customizer for now.

Linktree to a Website: Get Your Content Ready

Hopefully, you have at least one image that you can use for your site. Any image will do. If the site is for yourself, then a picture of yourself is fine. Before you add the picture to the block editor, you’ll want to make your image website friendly. You should reset the width of your image down to 600px.

Linktree to a Website: Set Up Blocks

Next, you’ll want to add your content in the block editor. From the main admin page, go to Pages > “All Pages”, then select “Sample Page”. Change the title from “Sample Page” to “Homepage”. Then delete all of the text in the body of the page.

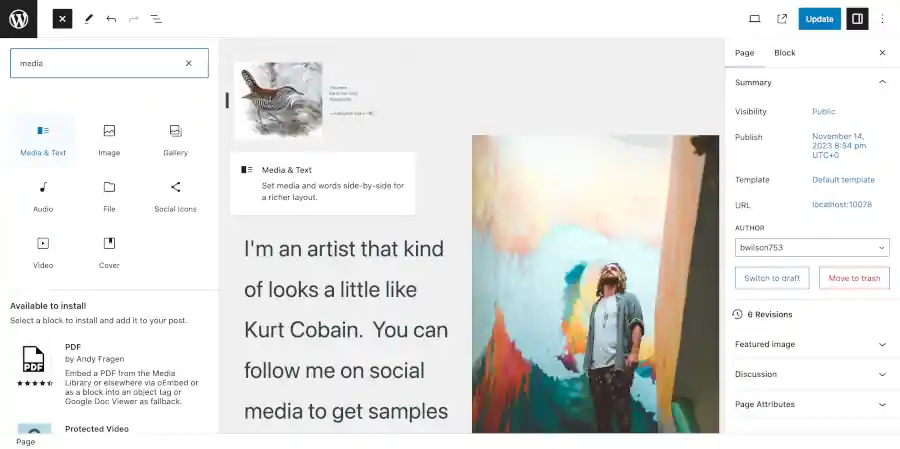
Next, you should add a media & text block. The picture below shows you how to add it.

Linktree to a Website screenshot

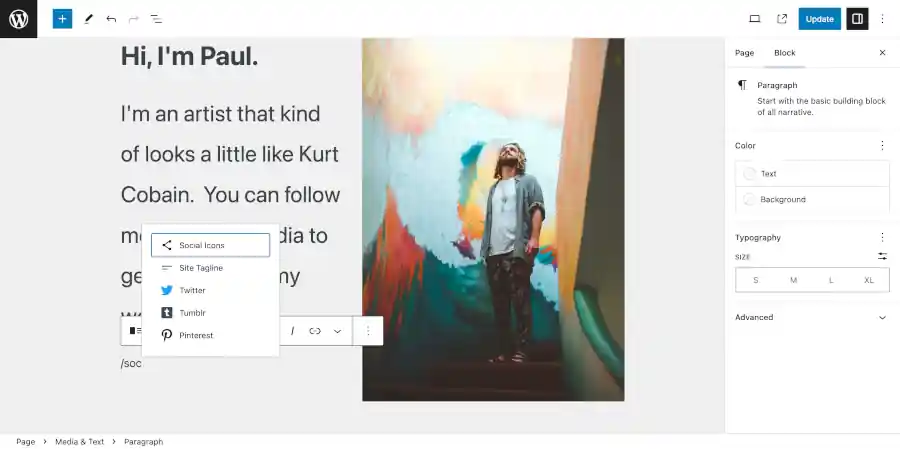
You can add text by adding text to a block in the text section. You can add a block by clicking in the section. If you want your text to be a heading, then type “/he” in the block and select the heading option. You can use the same technique used to add social icons referenced in the picture below.

Type in something about yourself. Then add that image that you made website friendly referenced in the previous section of the this blog post.

Add Your Social Icons

Next, you should open a new block and type “/soc”. You can select to add a social icons block. See the picture below:

screenshot

Add the social icons block. Then select the entire social icons block (as opposed to an individual icon). You can click the icon to the left on the block bar above the block to select the outer block. Using the block bar that hovers above the block, you can change the size. I recommend the huge setting. And using the block tab on the right side of the screen, you can change the style to “Logos Only”. Then change the color to white. You can also change the size of the text above the social icon by clicking on the each respective text block and adjusting the size using the block tab on the right side of the screen.

If WordPress does not have all of your social media icons, then you can add a row of custom buttons in a new block below your social media block. You can get this started by using the technique featured in the picture above, but substitute the reference “/but”.

Add a Custom Class

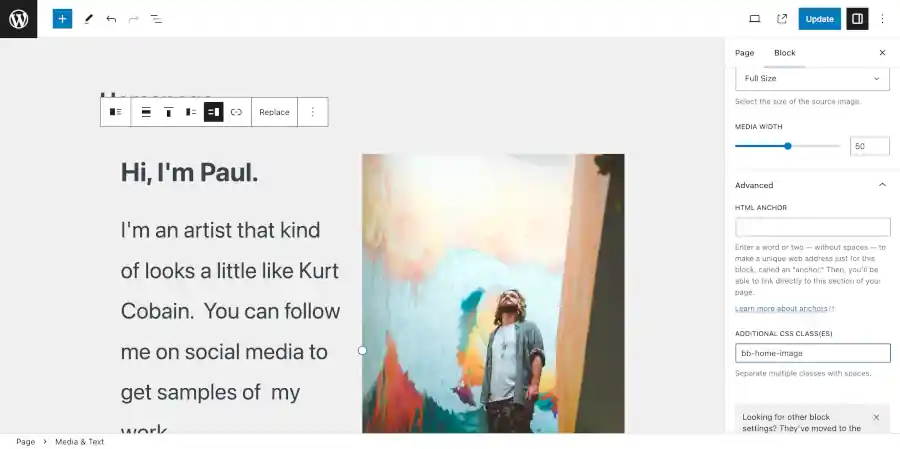
Finally, you want to add a custom class that we’ll use later. Select the media and text block (not the contents inside). Then go to the block tab on the right side of the screen. Then go to advanced and add “bb-home-image” under the Additional CSS classes section. See the screenshot below:

Linktree to a Website screenshot

Make sure that you save your work before you leave.

Delete Unused Pages

Since this is a one page site, you’re going to want to go back out to the main admin page and delete the “hello world” blog post. You can do this by going to posts, then find the “hello world” post and click “trash” underneath it.

Linktree to a Website screenshot

Set Up the Customizer Part 2

Now that you have all of your content in place, you want to refine how your site looks even further. Go to Appearance > Customize.

Now is the time to change the way your colors look. You might think that it looks pretty dark. Go into the customizer section marked colors. Then update the colors to “212529” for “Navbar and Footer Foreground Color”, “Body and Sidebar Foreground Color”, and “Background Color”.

Linktree to a Website screenshot

You may also want to turn off the “Shadow Halo and Link Color Backlight”. And you may want to switch “Body Link Color” and “Body Link Hover Color” to white.

Custom CSS

Next you may want to remove the back to top button since your page is so small. Just go to the Additonal CSS section and copy and paste the following:

#bb-back-to-top {
	display: none !important;
}

Next we’re going to use the home image class we added. Add the following to Additional CSS:

.bb-home-image img {
	box-shadow: 10px 10px;
}

The result should look similar to the following:

Linktree to a Website screenshot

Now, you have a great foundation for your website. You’re ready to publish it and share it on social media. As you obtain more content that you wish to share, you can use the instructions below to add more stuff.

Advanced Options

Integrating Website Creation Disciplines: Content Development, Design, and Web Development

Integrating website creation disciplines doesn’t seem to be a subject that is discussed very often. The line between content development, design, and web development can often blur. But each activity is often organized independently without regard to the other discipline.

For example, should you waste your time thinking about how to integrate the display of a video onto your website if you don’t have a video to display? Even if you have a video, have you figured out a way to make sure it loads well on mobile? People will often spend a great deal of time trying to solve the problems of one discipline without solving the other two. This leads to a lot wasted time, effort, and money.

In our hyper specialized world, is it possible that a single person ought to be performing all three disciplines simultaneously?

Integrating Website Creation Disciplines: Understanding the Three Disciplines

Content development determines the information and media used by a website. This may be a single job that requires only occasional minor updates, or it may be something that requires regular updates.

Design is all about how a site looks. You should design with more than just aesthetic appeal in mind. Design should be considerate of functionality too. Content should be able to be located efficiently, but there should also be consideration for letting people know what is available. You can probably already see how the line between content development and design can blur.

Web development is all about putting content development and design into a practical reality that people can reach and understand. But content developers and designers create things that aren’t always feasible. And people that understand web development often know about tools that people in content development and design are unaware of. And content developers and designers often create things that are unnecessarily complicated or oversimplified.

Content Development, Design, and Web Development are Reciprocal

Does a photographer need to learn how to use a camera? Does a canvas artist need to learn how to paint? The answer to both questions is yes. So why doesn’t a content creator need to learn how to design and develop. Well, some content developers do learn how to design, so why don’t they learn how to develop too. You may argue that the issue is inefficiency. Or you may argue specialization produces quality.

Specialization may be effective if there is adequate communication. A member of a rock band doesn’t learn how to play every instrument. And a director doesn’t necessarily need to learn cinematography or writing or special effects. But everybody needs to make sure that they all understand the common goal that they are trying to achieve if they want to be successful. Miscommunication leads to disruption of performance. It’s not an accident that the novel (written by an individual) that was the basis for a film is usually better than the film. The novel is better (at least in part) because the communication process required to develop the novel is simpler.

What Information Do You Want to Provide?

Each website has a unique set of information that it will provide. Any design template you use should recognize this problem. So at the very least, if you use a template, then you should have a template that displays all the content you have. And it shouldn’t display features for content that you don’t have. One of the easiest ways to start a bad website is to mold your content to the design.

Integrating Website Creation Disciplines: Creativity and Functionality

Design oriented people like to get credit for being creative. This desire is often obstructive of functionality. I’ve already written about some of my design pet peeves. So I’ll try to stay out of the weeds on this subject. The only point I want to make is when you work with somebody that has knowledge of all three disciplines, you can expedite resolving these problems by working with someone with the experience necessary to avoid them.

Integrating Website Creation Disciplines: Design Tools

Creating a mock up of a website using design tools can put limits on your imagination. If you use tools to design your mockup, then the mockup tools limit the things featured on your website.

When it comes to design, it’s common practice for website designers to create a Figma or a PDF file for a web developer to base a website on. But this method serves as an intermediary to the website creation process. From the perspective of efficiency, this is a good way to create more websites faster, but it may not be the best way to create the highest quality website possible.

Using a pencil and paper may provoke you to imagine ideas that you may not be able to facilitate with a web design tool. But even if your design can be created, it may take a period of time so significant that it isn’t worth the effort.

Using website building tools to directly mock up your website into a finished product can also provoke limitations. Sometimes the simplest way to get something to look the way that you want it to is to just hard code it. Even if you have the ability to extend an existing feature (for example, a style extension on a WordPress block), you may find yourself in a situation where the existing infrastructure makes it impossible to update. Or even if it doesn’t make it impossible, your update may be precarious and potentially broken by an update for the existing infrastructure.

So what should you do?

Do You Have Sufficient Resources?

You should think about feasibility as you’re designing your website. Don’t assume that because you saw somebody else do it on another website that it will be good for your website. How much did you test the website that inspired you? Does the inspirational website have access to resources that won’t be available to you?

First your website needs to be technological feasible. And even if it is feasible, it needs to run well in a variety of environments. You’ll need to ask yourself how much you want to compromise to service different environments. Don’t forget to consider how much time you will need to build your website.

Integrating Website Creation Disciplines: Size Matters

The larger a website is, the longer it will take to bring it into existence. Consider that if you have a simple one page website, it may be worth putting more time and effort into the details of the page. But if your website is so large that you will be constantly adding new content, then you may want to use a simpler layout. A simpler layout allows you to post more new content faster. It requires fewer actions for page creation.

Specialization and Website Management

The more people that you use to build your website, the more people that you will need to manage your website. This costs more money and increases the potential for problems. Having a team may give the illusion of security because it implies checks and balances. But a chain is only as strong as its weakest link.

Integrating Website Creation Disciplines: Website Builders

People are always looking for ways to give design oriented people a user interface design that is easier to use. And people are always looking for ways to give people without technical or design skills a simple template that they can just plug their content into.

Artificial intelligence promises to make hard coded web development obsolete. But the promise of making coding in web development obsolete isn’t new. There seems to be a continuous pattern.

  1. Somebody comes up with a simple way to make an okay website by creating a website builder.
  2. People want their websites to be better, so they want to add new features to the website builder.
  3. The website builder can do more but it becomes harder to use.
  4. The performance of the website builder begins to falter.
  5. The website builder is frustrating because it is too difficult to use.
  6. Somebody new comes up with a new idea for a new website builder.

The bottom line is there always has been (and likely always will be) a need for technical expertise in website creation.

Integrating Website Creation Disciplines: Combining the Three Disciplines

In our hyper incorporated world dedicated to creating an infinite array of specialties, it may seem counterintuitive to combine three complex specialties (content development, design, and web development) into a single discipline. And yet we are constantly trying to create technologies that do exactly that. In both business and art, efficiency matters. A thing is never worth anything if the thing is never finished.

The key to holding the highest standard of quality is to remember that you need three interdependent disciplines that all require their own training. Emerging technology can create the impression (the dream) that one discipline can automate the other disciplines out of existence. It may be pretty to think so. But anyone who is currently chasing that dream is like the proverbial jackass walking after the carrot on stick that’s forever out of reach.

However, automation does make it possible for one person to learn all three disciplines. When the three disciplines are contained within a single person nothing gets confused during the communication process and all interdependencies get accounted for.

Hiring Someone Who Can Handle All Three Disciplines

It can be difficult to find somebody with all three of these skill sets. Who has the time and resources to learn all three disciplines? Corporations don’t foster an individual learning all three disciplines. They have to worry about how they will replace their employees. They don’t want their employees to become too valuable. Consequently, managers with underdeveloped practical experience try to solve problems with a perspective that is too abstract and academic. Corporations push the assembly line model. They make each employee’s task simpler and cheaper until they are automated out of existence. That model may work for a large corporation, but it isn’t realistic or effective for a small or medium sized business.

Fortunately smaller businesses have the option of hiring out a third party generalist. When you can a hire a professional that has practical experience in all three disciplines, even if your small business can handle some of the disciplines itself, you can save yourself a lot of time and money by working with one individual that solves all of your other problems using real world perspective.

Subscription Website: Developing a Website Using Subscription Services

Have you been thinking about developing your website by purchasing a subscription website? Subscription websites have aggressive marketing campaigns. So you’ve probably heard of a few. But are any of them a good option for you to use to build your website?

Defining a Subscription Website

A subscription website is a website that you have to pay a monthly fee to use. This goes beyond simple server fees. A subscription website wraps everything up into a single package. This may seem like a good idea if you want to keep things simple, and if you have the means to pay a premium. But a subscription website is expensive over the long term, and it requires you to give up your freedom to mix and match different services and features.

It’s important to mention that the subscription websites that I’ll be referencing are referring to subscription websites that are used to create websites. I am NOT referring to subscription websites that people pay a subscription fee to visit. Those kinds of sites are often referred to as membership websites.

Subscription Services Versus Subscription Websites

Not everything that is paid for with a subscription fee ought to be considered a full blown subscription website. For example, many services charge a subscription fee for using software. This may or may not be a good idea depending on the quality and services provided by the software distributors. But if you are applying the software to a website that you own, then you should not consider yourself a user of a subscription website. You are only a user of subscription software.

Managed Hosting Versus a Subscription Website

I discussed managed hosting in an earlier article. You shouldn’t consider this a subscription website. However, subscription websites tend to include managed hosting which gives them another reason to charge you more money.

Buying Your Website Versus Leasing Your Website

Subscription websites don’t really allow you to own your website. When you build a website yourself or with a developer, you can own all of the software that makes it run. And you aren’t forced to use templates that force you to add content you don’t want, and/or don’t allow you to use content that you want to use.

Breaking Down the Long Term Costs of Different Web Builds

In the short term, a subscription website might not seem so bad. But if you add up the costs over time, then you might get a different impression.

Anecdotally, my research has shown me that a cheap subscription website will run you at least sixteen dollars a month while the most expensive sites run as high as two hundred and fifty dollars a month plus a set up fee. It’s also worth noting that the low end of the subscription website price range is about the same price as a low end managed hosting service. So you can imagine that the low price subscription service probably provides pretty minimal quality.

But suppose you were only going to pay sixteen dollars per month for the minimal service. After five years, you’ll have paid almost a thousand dollars. And then you still have to keep paying. That means even if you paid a thousand dollars total for a custom website built by a developer (and your site would probably work a lot better than a sixteen dollar a month subscription website), you would still end up paying less than you would for a subscription website if you owned your custom website for over five years.

If you own your custom website for over ten years, then your price would eventually get cut in half even after server fees. Don’t forget that your monthly fees for your subscription website are likely to rise. You should also consider that if you don’t need a large website, you can probably get a nice custom site for a lot less than a thousand dollars.

Subscription Website: Lost Ownership

If you own your business, then why wouldn’t it be important to own your website. When you don’t own your website, then you’re at the mercy of the true website owner. Your owner can charge you whatever amount that they deem to be appropriate. And your only recourse is to build a completely new website. If you own your website’s content and most or all of its software, then you won’t need to rebuild it from scratch.

Losing Control of Supporting Services

Does your business require an ordering service or a shop? Who owns that? What if you want to update your shop without updating your primary website or vice versa? How much control do you have? When you own your base website, you may also own your commerce software, or you may pay a subscription fee for the software (like for a pizza shop). In either case, the software can operate independently from the rest of your website. So you can update your supporting service vendors without it affecting the rest of your website.

But if you have a subscription website, then you can get stuck with the same vendor for all of your software. And this minimizes your vendor’s competition because of the increased expense of you changing vendors, thus incentivizing you to keep your subscription website.

How Much Control Over Your Website’s Design Do You Have?

If you like the way your subscription website looks, then there is something to be said for that. But if you want any creative input, then subscription websites can be cumbersome. Subscription websites have a lot more room to either push back or gouge you on prices. If they know that you are afraid to own your website, then what is your recourse if they tell you no?

Subscription Website: The Cost of a Major Overhaul

When you own your site, you can compartmentalize parts of your site, so you can avoid ever having to completely rebuild from scratch. But if you want to leave your subscription website, then starting over from scratch may be your only choice. Your subscription site may have proprietary software that doesn’t transfer. And more likely than not, they’ll try to talk you into overhauling your website by staying with them, requiring you to continue to pay their higher prices.

Do You Need Help Setting Up Your Website?

Setting up your website yourself can seem overwhelming. It can be helpful to work with a professional. Check out my custom development services to lean more.

Questions?

If you have any questions, then please post them in the comments section.