How to Communicate Complex Technical Ideas

If you need to communicate complex technical ideas, then you need to have patience for and dedication to the communication process. Having high expectations of comprehension and being unwilling to take responsibility for forming a solution is the path to misery and the path to the dissolution of collaboration. If you want to communicate complex technical ideas, then you have to be willing to learn and teach indefinitely.

Forming a Relationship to Communicate Complex Technical Ideas

When two parties meet for the first time, it is difficult to know what to expect from one another. In tech culture, it is not uncommon for some people to feel imposter syndrome and for other people to be impatient with people with less knowledge than them. Feelings are hurt easily and frequently. Intelligent people are dismissed for superficial reasoning. Collaboration between two parties that has the potential for building something great can be thwarted because of a lack of functional communication. This is usually the result of unrealistic expectations and impatience.

The Things that SHOULD Be Reliably Understood By Both Parties

Assumptions of knowledge should be minimal until they are stated explicitly. It is better to over communicate complex technical ideas than under communicate complex technical ideas. Over communication can seem tedious and time consuming. But oftentimes what seems tedious for one party may be insightful for the other party. And this insight may be a great preventative measure for future problems.

The Things that Should NOT Be Reliably Understood By Both Parties

Some things are just too difficult for both parties to know. This should be expected.

Never assume that somebody is naive just because they don’t know what you know. They probably also know important information that you don’t know. And don’t assume that just because you think something is a naive question that the person asking the question is generally naive. An attitude like this only debilitates the communication process.

The Things that MAY Be Reliably Understood by Both Parties

Communication should generally be encouraged until both parties have a general intuition for each other’s perspective. You need to see communication as a process and not a result if you want to successfully communicate complex technical ideas. Things that MAY be reliably understood by both parties will be many at the beginning of the relationship. These things should become fewer as the communication process persists. But these things may increase if the communication process halts.

You should always have the goal of putting things that MAY be reliably understood into a category of what SHOULD or should NOT be reliably understood by both parties.

Making a Spaghetti Dinner

If a chef is hired to cook for a restaurant owner, then the restaurant owner can reasonably expect that the chef knows how to cook. So what happens when the restaurant owner wants a spaghetti dinner cooked?

The new restaurant menu reads spaghetti and meatballs.

The chef is presented with spaghetti and meat.

The chef approaches the restaurant owner and asks, “How should the meat be prepared?”

The restaurant owner is overwhelmed with other problems and doesn’t have time to explain things, so he is infuriated by the question and replies, “I hired you because I expected you to know how to do this.”

But the restaurant owner’s impatience makes him blind to the intent of the question. The intent of the chef was to clarify whether the owner wanted meat sauce or meatballs. The restaurant owner assumed that the chef read the menu. But the chef had never had the opportunity to read the NEW menu.

The chef assumes that he should make meat sauce instead of meatballs and more calamity ensues.

It Only SHOULD Be Known If Both Parties Believe that It Should Be Known

It doesn’t matter if the restaurant owner believes that the chef should have known that the restaurant only serves meatballs. If the chef didn’t know it, then the chef didn’t know it. The communication break down still exists. The restaurant owner may have given himself a justification to fire the chef, but this won’t make his customers anymore likely to attend his restaurant. The owner isn’t solving his problems. He’s causing new ones.

Closing the Gap on What MAY Be Reliably Known

If you want to build communication, then righteous indignation is rarely helpful. Both parties have to have an intrinsic desire to solve the problem. Fear and intimidation should not be used as a means of provoking the communication of complex technical ideas. This always debilitates communication. All requests for communication should be considered valid, necessary, and beneficial to both parties. The simplest solution is to engage in the communication process. Participation usually facilitates results.

Seek Solutions, Not Problems

Blaming and a sense of entitlement only implies impotence to solve the problem. It’s reasonable for the restaurant owner to have felt overwhelmed. But it’s possible that his competitor’s ability to keep his cool will lead to the demise of the restaurant. If a problem is expressed, and the solution is not explicitly recognized by both parties, it generally behooves both parties to presume that an appropriate solution is not understood.

If the goal of both parties is to find a solution, then both parties will win. But if your goal is to define a problem, then you may win the argument, but you are then relying on the other party to solve the problem. Even if you are incapable of facilitating a solution, you should still try to take responsibility for witnessing a solution to come to fruition. This isn’t micromanaging. This is showing that you care about a problem that has been brought to your attention.

Platitudes Provoke Problems With Communicating Complex Technical Ideas

If someone is confused, then giving vague advice usually only breeds more confusion.

The phrase, “pay attention to detail,” comes to mind. I can’t think of any advice that I have heard in my life that is much more useless. Knowing the importance of detail is intuitive. What is difficult to understand is knowing what detail is relevant. Relevant detail must be learned through the process of communication.

Specificity Provokes Solutions to Communicating Complex Technical Ideas

The problem with most problems is they can’t be solved because they are not properly understood. If you tell someone that their website is running slow because they’re not using caching, then you may cause them to try to implement a solution that is worse than the original problem. But if you break down the problem from the abstract into the practical, even if all of the necessary information is not given, a solution can often be discerned and new problems can be avoided.

Quality Communication Provokes Understanding Relevant Specificity

The best way to know what needs to be known is to stay checked in. It’s really helpful to have empathy and manners. Both parties should be given room to work, but neither party should ignore requests for communication. These don’t have to be contradictory ideas. It just requires a reasonable balance of patience and consideration. If you give people time to understand and the opportunity to be heard, then relevant specificity becomes intuitive.

Both Parties Need to Be Good at Teaching and Learning

The reason why optimistic small businesses can overthrow pessimistic large corporations is small businesses are not encumbered by hierarchy and it’s tendency to disrupt candid conversation. There’s a fine line between criticism and consideration. Usually, the only distinction in interpretation is disposition. Optimists tend to see consideration when pessimists tend to see criticism. Optimism also breeds the patience to teach and the humility to learn.

Please Ask Me a Question About How to Communicate Complex Technical Ideas

I’ve put a lot of thought into this post, but it isn’t worth anything if you don’t understand it. I’m not offended by questions. On the contrary, I appreciate your willingness to give your time and consideration. If you were confused by something, then it is likely that someone else was confused as well, and my explanation could be improved. Please post your questions in the comments section.

And if you think that you have something to teach, the please feel free to share that as well.

Thanks for reading.
Build Your Own Local Fonts WordPress Plugin

Building a WordPress plugin may seem daunting. But building your own local fonts plugin is actually pretty easy. The great thing about having your own plugin is your fonts will stay with you if you ever decide to change your WordPress theme. There are lots of different plugins that will allow you to set your fonts locally. But most of them feature a lot more overhead than is necessary. Most of what makes loading fonts locally complicated is understanding the font file path and assigning the font families.

This tutorial will be using the Big Themes as an example, but you should be able to use your new plugin with almost any theme that allows you to add custom CSS.

Assumptions

This is an advanced tutorial. You should understand the distinctions between hosting fonts with a third party CDN, hosting fonts locally, and using web safe fonts. You should also understand the basics of setting up a website.

Why Would You Bother Adding Your Fonts Locally?

Hosting fonts locally has become popular among many circles. But I generally don’t advocate for hosting fonts locally if it is unnecessary. Hosting fonts locally introduces a number of new problems that can be avoided when calling fonts from a third party CDN or using web safe fonts. But if it is done properly, then hosting fonts locally can be competitive with a third party CDN, but it probably will not outperform it with any consistency or significance.

In many cases, hosting fonts locally isn’t worth the time and effort. However, there are some reasons that you may want to do it. This tutorial assumes that you understand why you want to host your fonts locally and you have considered your other options such as using the Google CDN or using web safe fonts. It also assumes that you are using your own CDN to host your fonts. If you don’t have your own CDN, then hosting fonts locally will almost certainly slow down your site’s page load speed.

Update (7/31/24)

I have written a new article about Cloudflare Fonts that expands on this blog post’s discussion. It may make it unnecessary for you to go through the hassle of adding a plugin.

GitHub Template

I have created a plugin template called add-local-fonts that you can download and add to your WordPress plugins folder. It isn’t mandatory that you use this template because I will explain how to build your plugin one file at a time. But using this plugin may be helpful because you can use it to get something loaded and working fast, then you can modify it to serve your purposes.

Using CPanel

This demo will show you how to add a new plugin using CPanel. Most major webhosts use CPanel, so there is a good chance that you have access to this feature. If your webhost doesn’t use CPanel, then you will have to access your files using some other resource. If your webhost doesn’t have any kind of file access software, then you will need to set up a file transfer service like FileZilla.

Even if you have CPanel, I recommend using FileZilla to transfer the plugin template. Setting up FileZilla goes beyond the scope of this tutorial. But if you have it set up, then all you have to do is download my plugin, then unzip it, then transfer the file inside of it labeled “add-local-fonts” to your plugins directory.

Building the Plugin Using CPanel

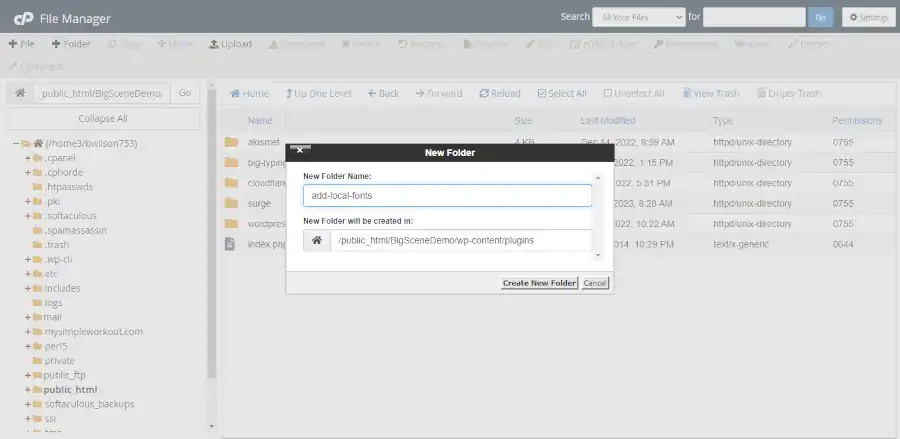
Go to CPanel, then go to File Manager, then find your plugins directory by clicking through the file path “The name of your home WordPress folder” > wp-content > plugins.

Next, click on the button “+ folder”, then create the folder add-local-fonts.

local fonts
Adding a new plugins folder with CPanel.

Adding the Local Fonts Main Plugin File

Next, double click your new “add-local-fonts” folder, then click on “+ file” button, then add a blank file named “add-local-fonts.php”.

Then right click the new file and choose edit, then add the following code and save it.

<?php
/**
 * Plugin Name:       Add Local Fonts
 * Plugin URI:        https://bigbobnetwork.com/
 * Description:       Loads fonts locally.
 * Version:           0.1
 * Requires at least: 5.9
 * Requires PHP:      7.4
 * Author:            Bob Wilson
 * Author URI:        https://bigbobnetwork.com/
 * License:           GPL v2 or later
 * License URI:       https://www.gnu.org/licenses/gpl-2.0.html
 */

function big_bob_add_font_scripts() {
    wp_enqueue_style( 'bb-add-fonts', plugin_dir_url( __FILE__ ) . '/bb-add-fonts.css?v=0.1', array() );
}
add_action( 'wp_enqueue_scripts', 'big_bob_add_font_scripts' );

All the main plugin file does is add another file, so now we’ll add that file.

Adding the Local Fonts CSS file

Using the same process, you want to add a file named “bb-add-fonts.css”, then add the following code to the file.

@font-face {
	font-family: Abel-Regular;
	src: url(Abel/Abel-Regular.ttf);
}

@font-face {
	font-family: RobotoCondensed-Bold;
	src: url(Roboto_Condensed/RobotoCondensed-Bold.ttf);
}

@font-face {
	font-family: RobotoCondensed-Regular;
	src: url(Roboto_Condensed/RobotoCondensed-Regular.ttf);
}

@font-face {
	font-family: SpecialElite-Regular;
	src: url(Special_Elite/SpecialElite-Regular.ttf);
}

This is just a template. You want to pay special attention to each file and how it is named and called and formatted relative to the directory path. You will use the same syntax and formatting when you add your fonts. The directory path (the part labeled src) will make more sense once you have added the font files to the plugin.

Choosing Your Local Fonts

This tutorial will show you how to add fonts from fonts.google.com. You can look up the fonts being used in this demonstration on their site and download them from there, or you can take them out of the plugin file in my GitHub repository. However, if you are using Google fonts, you can also let Google host them for you.

But you don’t have to download fonts from the Google fonts website. You can use any fonts that you have a license for. Not having a third party CDN to host your fonts is probably the best reason that I can think of to host your fonts locally.

Add Your Local Fonts Files

When you add files via CPanel, you can’t transfer folders, you will have to create the folder using the instructions above. This is one reason that file transfer software like FileZilla is preferable. All of the folders will have to match the paths defined in the above CSS file. This will be discussed in more detail below.

You can upload files by clicking the upload button. Then you can drag and drop each file into the appropriate folder. Or you can double click the folder you want to add it to and add it directly. You can restructure your folders as you see fit. Or you can put all of the font files in the main folder. However, you decide to structure it, you need to make sure that the paths in the CSS file are consistent with the location of your font files in the plugin.

For example, you could restructure your files like this:

local fonts
The various file path possibilities for font files

Then update your CSS file to this:

@font-face {
	font-family: Abel-Regular;
	src: url(Abel/Abel-Regular.ttf);
}

@font-face {
	font-family: RobotoCondensed-Bold;
	src: url(fonts/Roboto_Condensed/RobotoCondensed-Bold.ttf);
}

@font-face {
	font-family: RobotoCondensed-Regular;
	src: url(fonts/Roboto_Condensed/RobotoCondensed-Regular.ttf);
}

@font-face {
	font-family: SpecialElite-Regular;
	src: url(SpecialElite-Regular.ttf);
}

Add Additional CSS to the customizer

At this point, if you’re logged into to your WordPress admin center, then your file paths may not be saved and/or cached properly to your WordPress admin center. Before you go any further, you probably want to either completely close down your browser, or open your wp-admin in a new incognito (in private) browser, or use a different browser.

It can also be helpful to update the version number in your PHP file. This means you can change the demo from:

bb-add-fonts.css?v=0.1

to:

bb-add-fonts.css?v=0.2

Once you are in your WordPress admin center go to Appearance > Customize > Additonal CSS.

If you are using any of the Big Themes, and you are still using the demo fonts, then you should be able to add the following code to the Additional CSS section and notice an immediate change in your fonts. But if you don’t see a change, then try an incognito window or a different browser. You can also try changing the version number in the PHP file using the method referenced earlier.

/*Title Fonts*/
.site-title, .bb-site-title-top,
.bb-forest-cover h1,
.bb-forest-cover h2,
.bb-forest-cover h3 {
	font-family: RobotoCondensed-Bold  !important;
}

/*Heading Fonts*/
h1, h2, h3, h4, h5, h6, .site-description, .bb-site-description-top {
	font-family: RobotoCondensed-Regular !important;
}

/*Paragraph Fonts*/
body,
p, pre, textarea, .comment-author, .entry-content li, .wp-block-latest-posts,
.entry-meta,
.entry-footer,
.nav-links,
.comment-metadata,
.reply,
input,
select,
optgroup,
.bb-sideStick li,
#bb-sideSlide li {
	font-family: Abel-Regular!important;
}

/*Menu fonts*/
#primary-menu li,
#bb-sidebar-menu li {
	font-family: SpecialElite-Regular !important;
}

If you aren’t using the Big Themes, then you’ll need to determine your font classes by inspecting them in your browser.

Remove All Calls to the Google CDN

You should remove any calls you have to the Google CDN since you are no longer using those fonts.

It’s easy to remove calls to the Google CDN if you are using the Big Themes. Just go to the Typography section of the Customizer and delete everything from the input boxes including white space.

If you aren’t using one of the Big Themes, then you will have to consult your theme’s documentation to determine what to do.

Confirm that the Google CDN Calls Have Been Removed

You can confirm that your site is no longer making calls to the Google CDN by opening up your browser’s developer tools. Once you have done this, look into the HTML section and try to find any reference to “fonts.google”. If you can’t find any references, then you know that the Google CDN calls have been removed.

Make Sure That Your Site is Redirecting to Your SSL Page

If you are using an SSL certificate, then it is always a good idea to make sure that visitors are always being redirected to it, but it’s significance can be more apparent when hosting fonts locally.

If a site visitor doesn’t go onto to your https version of your site, then the wrong fonts will probably be delivered if you are hosting locally. When you add your fonts locally, you are defining their location through a relative path. This is something that you don’t have to worry about if you are using web safe fonts or the Google CDN.

What should you do if your site isn’t redirecting properly?

If your WordPress site is your homepage, then usually all you have to do is go to Settings > General then make sure that WordPress Address and Site Address both start with https.

If your homepage isn’t part of WordPress, then you can update your .htaccess file using CPanel by adding the following to the top of the file.

RewriteEngine On   
RewriteCond %{HTTPS} !=on   
RewriteRule ^ https://%{HTTP_HOST}%{REQUEST_URI} [L,R=301]  

RewriteOptions inherit   
RewriteEngine on   
Header set content-Security-Policy: upgrade-insecure-requests   

Questions About Adding Local Fonts?

If you have any questions, then feel free to post them in the comments section.

Understanding WordPress Widget and Menu Areas

Widget areas and menu areas in WordPress are features that have been around for a long time. And in the age of blocks, you might have the impression that they are no longer relevant. But that isn’t true. If you don’t understand WordPress widget and menu areas, then you are missing out on features that have a huge impact on your site.

Assumptions Before Reading About WordPress Widget and Menu Areas

You should understand the basics about setting up a website and using WordPress before reading this post.

The Basics of WordPress Widget and Menu Areas

WordPress widget and menu areas are theme driven. They are areas within the layout of your site designated by your theme where you can add content. If the area being designated is a menu area, then you can add a menu. And if the area being designated is a widget area, you can add what used to be known as widgets. Although today, it is more preferable to add blocks.

The Difference between Widgets, Menus, and the Block Editor

The block editor is used to add content to the body of individual pages and posts. Widgets and menus are added to areas of your pages that are global or semi-global. Menus and Widgets solve the problem of setting content onto every page or certain types of pages.

The Basics of Adding Content to WordPress Widget and Menu Areas

There are two basic ways that you can add content to a widget area or a menu area. You can use the designated admin sections on the admin page of your site, or you can use the customizer. Once you are used to adding to these areas, you may find that it is easier to just use the customizer because the customizer shows you your updates immediately. However, the customizer doesn’t offer as much working space, and it provides less information, so learning how the admin areas work can be a simpler way to understand all of the widget and menu features.

An Example of WordPress Widget and Menu Areas

Lots of WordPress themes use WordPress widget and menu areas. However, some use a lot of areas, some use a moderate amount, and some don’t use any. So today, we are going to use the free Big Themes to perform a demonstration of WordPress widget and menu areas. In particular, we are going to be using the free Big Chill theme.

Examples of Widget Areas

There are two major areas that tend be used for widget areas:

  1. Sidebars: These appear next to the body of your page. They may be featured on every page of your site, or they may be segregated to certain sections of your site.
  2. Footers: The same footer is usually shown at the bottom of every page. Although some sites may use different footers based on the section of the site that you are using.

Widgets could be used in other areas as well. For example, widgets may be available in your navbar, or there may be designated widget areas that are unique to a given theme.

Viewing the Widget Admin Page

The best way to get a summary of how your theme’s widgets work is to look at your theme’s widget admin page. I’ll use the Big Chill theme to demonstrate how this works.

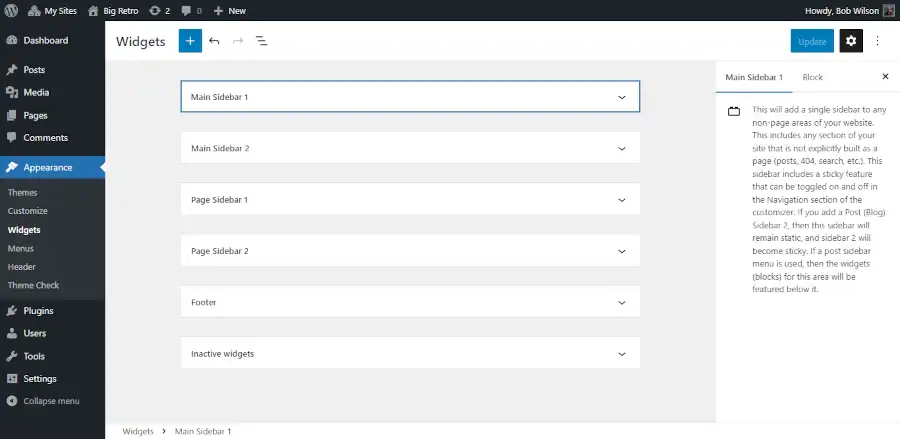
You can find the Big Chill theme in the admin center by going to Appearance > Themes > Add New > then type “Big Chill” into the search bar. Once you install and activate the theme, you can go to Appearance > Widgets. When you click on one of the widget areas you will see a description of how the widget areas work on the right side of the screen.

Clicking on a widget area in the admin center

How to Read Widget Sections

The best way to understand how your widgets work is to read each widget section description. You should click on each section and read what it says while paying attention to how it is distinct from the other widget areas. It may be helpful to open up a second tab in your browser and look at the customizer. This will be discussed in greater detail below.

Inactive Widgets

The primary reason that you have inactive widgets is that you created widgets in another theme and your new theme no longer supports those widget areas. You can use the inactive widget section to copy and paste your widgets or blocks into your new widget areas.

Viewing Widgets in the Customizer

Once you become familiar with how your widgets are placed into the different sections of your site, you may find that you no longer need the widget admin area, and you can rely exclusively on the customizer for managing content in your widget areas.

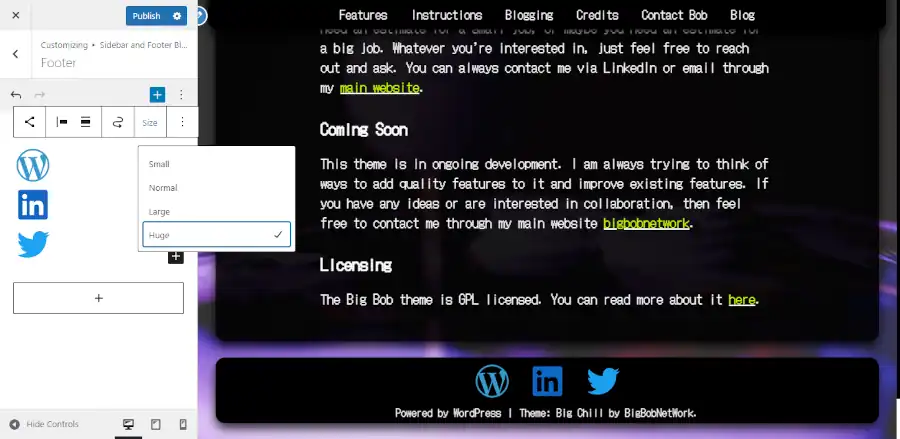
You can find the Widgets section of the customizer from the admin center in the Big Chill theme by going to Appearance > Customize > Sidebar and Footer Blocks.

Screenshot of adding social media blocks to the widget footer area.

In the customizer you will find that there isn’t as much working space, and you will only see widget options that are actively available. I have written about how to add sidebars and how to add footers by using the customizer in other posts, including how to add an advertisement.

Examples of Menu Areas

There are three areas where menus tend to be displayed.

  1. Navbar
  2. Sidebars
  3. Footer

The great thing about using menu areas is when you add a menu using a menu area (as opposed to using a block), the theme takes care of all of the styling for you based on where you set the menu.

Viewing the Menu Admin Page

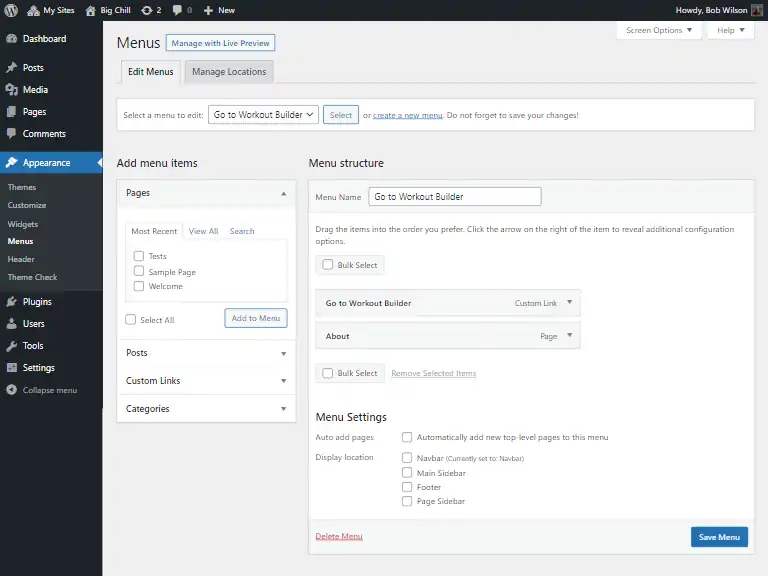
Using the menu admin page is a great way to get an overview of how your theme sets up its menus.

Main menu admin page

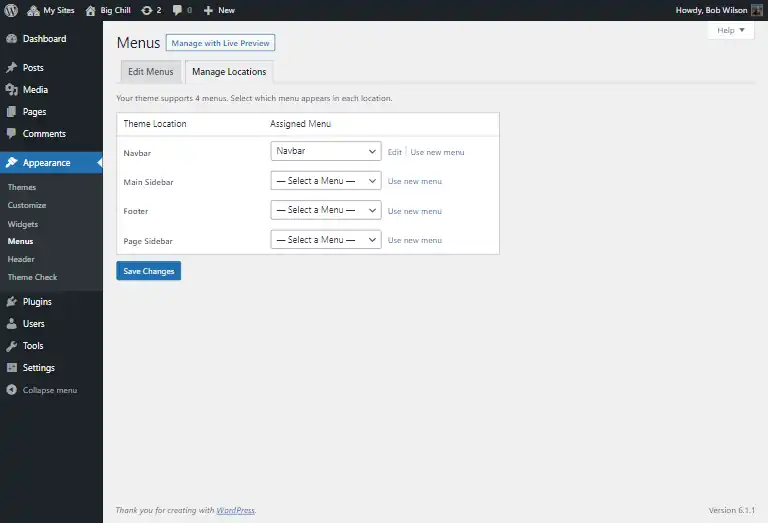
The controls are pretty intuitive, but it is important to pay attention to which menu is going where. So it can be helpful to look at the manage locations tab.

Managing the menu locations.

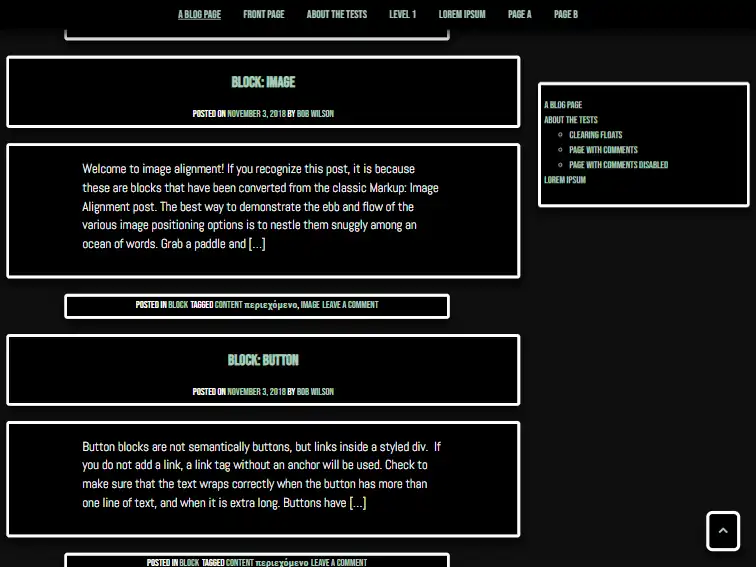
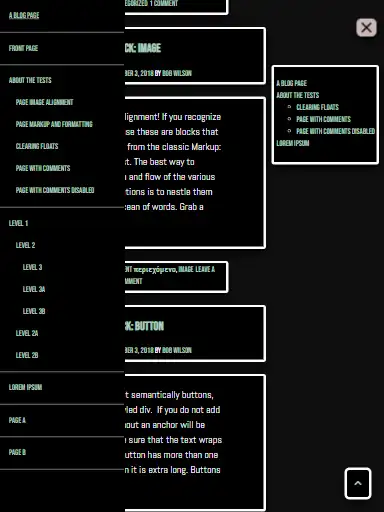
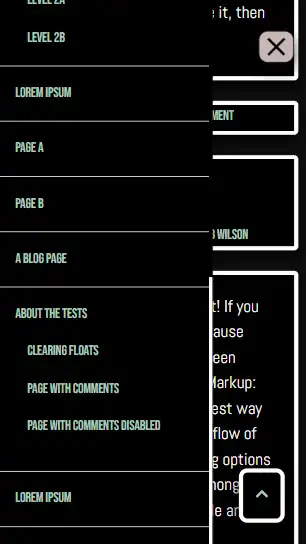
The important takeaway is that each menu location utilizes a unique menu. If you set the same menu in two different locations, then the same menu will appear in two different places. For example when using the Big Chill theme, you can add one menu to your navbar, then add another menu to your Main Sidebar and Page Sidebar areas. This would create and an extended sticky navbar. And it would collapse into the slide panel on mobile.

Full screen extended sticky menu
Extended menu on a tablet with the slide panel open
Extended menu on a phone in the slide panel

Viewing Menus Through the Customizer

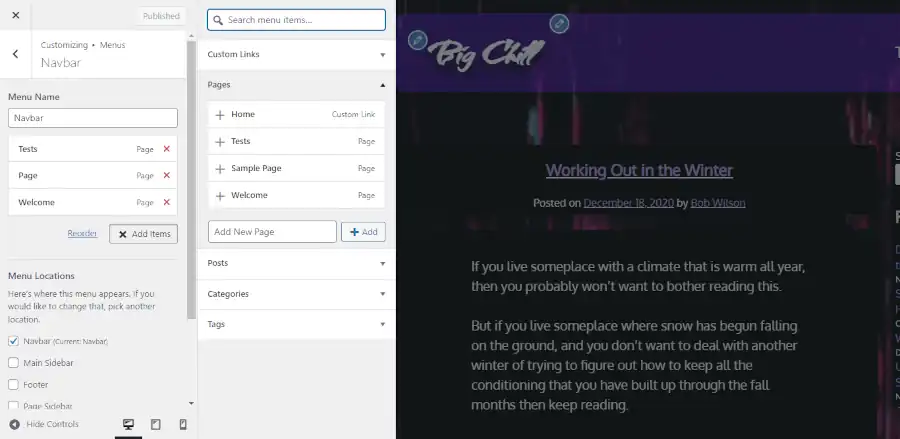
Once you have become familiar with how your menus are added by viewing the menu admin page, you can probably rely on the customizer menu section to manage your menus. The menu options in the customizer are a lot more extensive than the widget options.

Screenshot of Menu options in the customizer

The Relationship Between Widget and Menu Areas

You should pay attention to how your menus and widgets are juxtaposed against each other. The existence of one can impact the position of the other. Assess all of your options before you start adding most of your content.

Questions About WordPress Widget and Menu Areas?

If you have any questions, then please post them in the comments area.

How to Add a Header Video to Your Website’s Homepage

A video can be a great way to make your homepage pop, but adding a video is a lot easier said than done. A lot of problems can come up when loading a video that can have a significant negative impact on your site’s performance. This tutorial will give you a step by step explanation of your different options for adding a header video to your site’s homepage, and it will explain a video’s potential and its limitations.

Assumptions

This tutorial gives instructions on how to properly load a video to a WordPress site, and it gives instructions on how to load a video to a basic custom HTML page. So you don’t need to use WordPress to follow this tutorial. If you choose the HTML route, then the expectation is that you are proficient in HTML and CSS. No explicit design instructions are given for a custom page, so if you need further help with an HTML page, then you should consider contacting a pro. If you are setting your video to a standard HTML page, then you can ignore any of this post’s references to page caching, however a CDN is still recommended. These concepts are explained in greater detail below.

If you need to learn fundamentals about building a website, then you can read this.

Cost-Benefit Analysis of the Difference Between a Custom Site and a WordPress Theme

You don’t need to hire someone to set a video into your website. If you use a WordPress theme, then you will have a better chance of building the site yourself, instead of having to hire a pro. However, you need to take the time to set your video up right. If you don’t, then you will have a high probability of having a frustrating experience that won’t produce the results that you are looking for.

Demos for this Tutorial

This tutorial will refer to three different demos. It will refer to the video at the top of this post which you can jump to by clicking the “back to top” button in the lower right hand corner, and it will will refer to a custom site and a WordPress site that will be explained in the next two sections.

A Demo of a Custom Page with a Header Video

The biggest advantage of a custom HTML page is that you can minimize how much you rely on resources. This makes it easier to load a video file that has a larger byte size and runs for a longer period of time. You can also be more deliberate about how you set the video to different window sizes. You can see samples of how a custom page looks by clicking on either of the images below.

Screenshot of a large screen video on a custom page
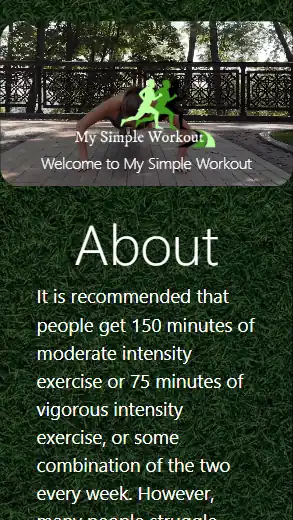
Screenshot of a mobile screen video on a custom page

At the time of the publication of this post, the video being shown in the custom site was 3.4 MB. This is pretty high. This wouldn’t perform well on a 3G phone loading in Mumbai, India. But it still should perform reasonably well on most well connected mobile devices.

A Demo of a WordPress Site with a Header Video

A WordPress site is a great way to add a video if you don’t know how to code. In particular, you can utilize any of the free Big Themes to serve your videos. They each have a number of options which will be discussed below. You can click on either of the images below to see a demonstration.

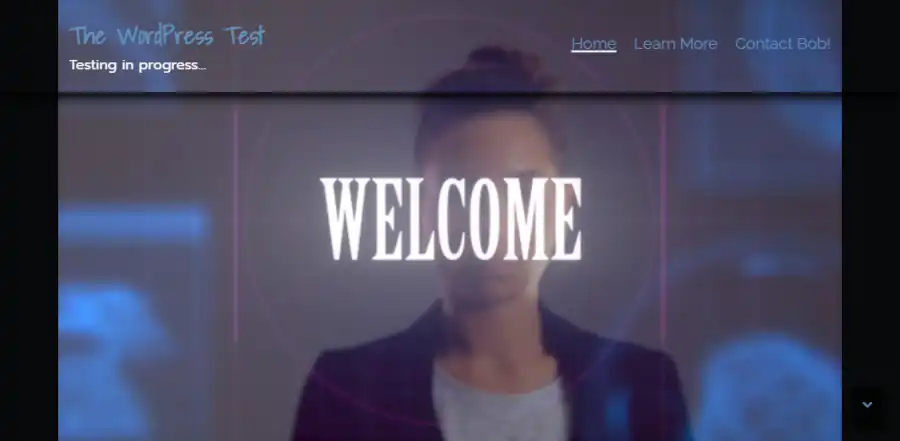
Screenshot of a large screen video using the free Big Bob theme.
Screenshot of a mobile screen video using the free Big Bob theme.

At the time of the publication of this post, the video being shown in the links just above this paragraph was 519 KB. You can use each demo to compare the difference in page speed for different video byte sizes. At the time of the original publication of this post, the video being shown at the top of this post was about 1.1 MB. I eventually reduced the size to 231 KB. A good trick that you can use for compressing your video is to upload your video to YouTube, then download it back onto your computer. YouTube will probably have compressed your video quite a bit.

Note that all three video demos also utilized background images in addition to the video when this post was originally published. This shows that even though each page is loading a video, the page can load reasonably fast on mobile even when other features using a significant byte size are utilized.

Update (5/29/23): The background image of the WordPress Test was removed and the theme was updated. The background image may be added back in the future.

Update (6/14/23): The background image for this blog was removed.

Page Load Performance when Adding a Header Video

The best way to get the fastest page load possible is to not use a video at all. The biggest problem that people have when adding a video is they are unprepared for how much a video has the potential to reduce page load speed. All videos will create at least a little deprecation in page load performance, but if you are careful then this performance depreciation can be trivial in comparison to the improvement in your visitor’s experience.

Finding a Good Video

An ideal video is one that you make yourself, however this may be something that is beyond your means. The following are three websites that you can obtain free open source stock video footage from right now:

  1. Pexels
  2. Pixabay
  3. Coverr

Another site worth mentioning is openverse. It doesn’t currently provide videos, but it is new, so it may be possible that this will change in the future.

You can also utilize YouTube videos with the free Big Themes. Make sure that you have made the necessary copyright considerations before you do this. Implementation will be discussed in greater detail later.

Use a Content Delivery Network (CDN)

If you are going to set a video into your site, then you will be dealing with media that has a large file size, so serving it through a CDN is pretty much mandatory. However, if you are unfamiliar with caching and CDN’s, then you should read about setting up the necessary caching software. When reading that tutorial, if you are not using WordPress, then you can skip over the sections about page caching and html caching.

Keep Your File Sizes Modest when Adding a Header Video

Even after you have set your website onto a CDN, you still need to keep your video’s file size reasonable. You want your video to load well across all devices, including mobile.

You should try to get your video’s file size as low as possible. How low should you go? You should try to get it low enough that it performs well on mobile. Ideally, you want the combined total byte size of your media (images, video, etc.) to be under 1 MB. If you have a good CDN, then you will probably be able to push your total file size a bit higher than 1 MB, but I wouldn’t push it any more than necessary. Later, I will also show you how you can set an alternative image for mobile which will allow you to use a larger video file size.

In addition to learning how to reduce your video’s file size, you should also learn how to reduce the file size of any other images that you may be using.

Editing Your Video to Make the File Size Smaller

Editing videos can be frustrating. Video editing will sometimes yield an unusable video. A video will just break after it loads for no obvious reason. But editing is necessary if you want your video to load well.

There are a number of different tools that are available for video editing, and it is impossible to write an exhaustive list. Today, I will show you how to use two different video editors:

  1. Window’s Video Editor: If you have a Windows operating system, then you probably have it already loaded on your computer.
  2. VLC: This is free open source software. It has fewer options than the Windows editor, but you can get your file sizes smaller. However, it seems to deliver more updated videos that break after being loaded onto websites.

Windows Video Editor

The Windows Video Editor is pretty intuitive, so I will spare you specific instructions. The most important things that you need to know are the two ways that you can reduce your file size:

  1. You can cut the total length of the video.
  2. You can reduce the dimensions of the video when you export it. However, you should keep in mind that a smaller export size can affect the performance of the video on larger screen sizes.

If you need more explicit instructions about using the Windows Video Editor, then please post your questions in the comments.

VLC

You can download VLC for free.

You can use VLC to cut the length of your video through a combination of recording and pausing. But I don’t recommend trying to figure this out because it is difficult to be precise.

Once you start playing around with VLC, you will probably set the features so that they are not to your liking, then you will forget the original settings. You can reset VLC to its default settings by going to Tools > Preferences > Reset Preferences (make sure simple is selected).

If you want to minimize page load speed, then your video’s image quality may need to be closer to standard definition than high definition. You can’t reduce byte size without compromising video quality.

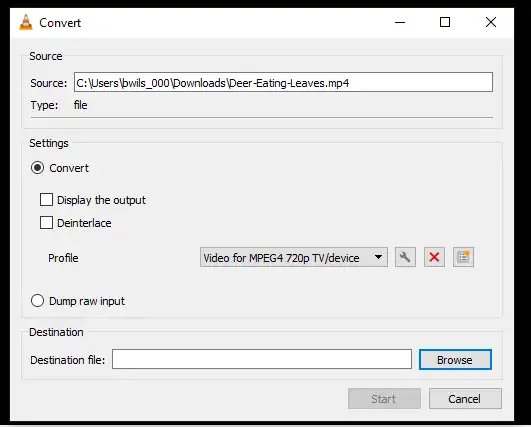
Go to Media > Convert/Save > Add > Convert/Save > then go to Profile and continue scrolling down until find “Video for MPEG4 720p TV/device”.

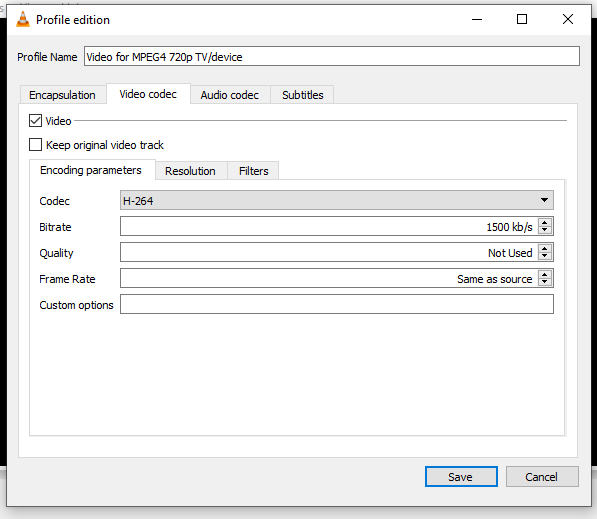
If this does not adequately lower your video’s byte size, then you should try to lower the bit rate. You can lower the bit rate by going to Media > Convert/Save > Add > Convert/Save > then go to Profile and click on the wrench. This will open up a new window. You can click on the Video codec tab, then lower the bit rate until it produces a video with an adequate byte size.

Keep in mind that either of these actions can result in the video having performance problems after you load it onto your site, so you may need to use some trial and error. If you find that the mobile byte size requirements requires that you set a video that isn’t long enough, then you also have the option of hosting your video through YouTube or substituting your video for an image or a GIF on mobile. Both of these options will be discussed in greater detail below.

Mobile Compatibility when Adding a Header Video

You have to consider more than page load time when you consider mobile compatibility. You have to consider how the video will fit to the page.

Choosing the Right WordPress Theme for the Job

You can’t just pick any WordPress theme if you want your video to look good and load to your specifications. If you don’t already know of a theme that has adequate video options, then I recommend the Big Themes.

However, even the Big Themes have their limitations. Each theme has gone through a number of theme changes. This has resulted in a lot of new features being added, but it has also resulted in a couple of features being dropped. The earlier themes had the ability to add featured videos (window sized video headers for any page), and it had the ability to add background images for any page. In the latest themes, featured videos are no longer available because they had too many conflicts when WordPress added query loop blocks. And background images are removed in later themes whenever there is a homepage header image or a window fitted featured image to improve page loading speed.

If you are looking for an older style theme, like the one featured in the WordPress demo, then I would recommend using the Big Scene theme and reading its instructions.

What Kind of Video Are You Using?

Before taking the time to assess how to set your video, you should assess the nature of your video. Is your video something that is meant to sit in the background, or is the whole video screen meant to be watched and focused on. Is it valuable if you only see fragments of it? With the Big Themes, you can set your video using three primary methods:

  1. Set your video to fit the window like in the WordPress demo.
  2. Set the video to the top of the body like in this post. You can click the “back to top” in the lower right hand corner to review this video.
  3. Set the video into the background. This requires a video that is more abstract and looks good even if you only see small portions of it.

Setting Your Video to Fill the Screen

By default the Big Themes set your homepage header videos to fit the screen. If you’re setting your video based on the window size, then you have three options for dealing with the negative space:

  1. You can fill the background with an appropriate background color. Your background color can be updated in the Colors section of the customizer if you are using the Big Themes.
  2. You can fill the background with a background image if you are using one of the earlier Big Themes.
  3. You can add custom CSS to fill the video across the entire screen.

Adding Custom CSS to Fill the Video Across the Screen

I have already written about how to set your video to fill the screen if you are using the Big Themes in another post. The only thing that I’ll add to the discussion is that that tutorial is not comprehensive. There are a number of different scenarios and personal preferences that you may want to use to suit your circumstances. If you have trouble modifying the code to suit your needs, then please post a question in the comments section.

There’s also an argument to made for trying to write a video sizing algorithm using JavaScript. Using a generalized algorithm would make updating easier, but you should keep in mind that if you were to use this method, the script would have to be loaded at runtime which would increase the page load time after your website first appears on the screen. It would also make it more difficult to specify certain conditions. For example, you may want it to fit on wide screens and fill on mobile sized screens.

If you want your video always set to fit, then you don’t have to do anything. This is the default setting.

Using a YouTube Video

It is also possible to load a video through YouTube, which is a great way to load large videos fast, however YouTube has several drawbacks:

  1. You have to set the video size to fit the screen. The above CSS tutorial will not work. And any remaining negative space will always appear black.
  2. Some browsers will stop YouTube from auto playing. This makes setting the video into the background problematic.
  3. It always announces that it is a YouTube video. However, you can use the navbar to cover some of this up on certain window sizes.

To add a YouTube video with the Big Themes, all you have to do is add the video’s address into the homepage header media section.

Setting Your Navbar’s Opacity

Most of the Big Themes allow you to change your navbar’s opacity. Navbar opacity is a measure of how easy it is to see through your navbar. You will probably want to do this to make your video more visible. You can find the opacity controls in the Colors section of the customizer.

A Note on Mobile Browsers when Adding a Header Video

If you set your video size based on the window size, then you should expect it to load lower on the page on some mobile browsers because they will move the bottom of the video below the viewport to make room for the address bar. The address bar will then recede into the top of the screen when the visitor scrolls down the page.

Setting Your Video to the Top of Your Homepage Body

If you are building your page from scratch, then you can you be more liberal about how you set your video. See the custom page demo. But if you are using a WordPress theme, then you will have to choose between layout options.

Adding your video to the top of the page body has the advantage and disadvantage of keeping the dimensions of your video smaller. This is an advantage because videos with smaller dimensions have lower byte sizes, but it is a disadvantage because you can’t make the video as big without distortion.

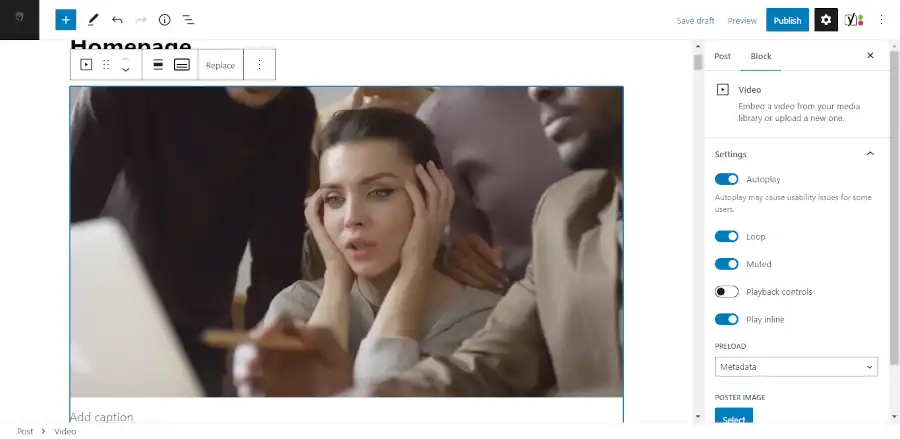
If are using WordPress, then you can use a video block. You can see a demo of this by viewing the video at the top of this post by clicking the “back to top” button in the lower right hand corner. Using this option will also let you set your video in front of a background image on the most recent Big Themes. Once you have set your video, you can use the block options to set your video to autoplay like in the screenshot below:

This is how you set a video block to autoplay at the top of the page body.

Setting Your Navbar’s Position Relative to the Body

The latest Big Themes allow you to set the page’s body relative to the navbar. This is a subjective process that will be affected by your background image, and the content of your navbar, and the content at the top of your page body. These options are great for distinguishing your layout on different window sizes.

Substitute an Image on Mobile

If you are trying to load a total media byte count that is larger than 1 MB, then you may want to consider substituting an image on mobile. You can cut a video frame into an image by using Windows Video Editor. You can then use the cropping feature to update your video frame so that it better fits a mobile device.

This will actually increase the page load on large screens because the image will be loaded first, then the video will be loaded. But on mobile environments only the image will be loaded, so the total byte size will be smaller on mobile. This allows you to use a video with a byte size small enough to run well on a desktop or laptop, but too large to run well on a mobile device.

If you are using one of the Big Themes, then make sure that the “Show Header Video on Mobile” control is switched off. This control can be found in the Homepage Header Media section of the customizer.

Consider a GIF when Adding a Header Video

Videos tend to have smaller byte sizes than .gif files, and videos tend to look better. But if you use a GIF then you can manipulate it like an image.

You can add a .gif file the same way that you add an image, and you can substitute it for a video the same way that you substitute an image.

There are an epic number of free ways to make a GIF, and I actually don’t make them very often. So I doubt that I can provide you with a better tutorial then something you can locate with a minimal amount of research using a search engine.

Setting Your Image or GIF to Fill the Phone’s Viewport

The Big Themes all have scripts to size your images to your visitor’s phone’s viewport. If you want your image or GIF to fill the screen, then all you have to do is turn on the “Big Header Image” control in the Homepage Header Media section of the customizer.

Using a Preloader when Adding a Header Video

The latest Big Themes all turn on a preloader whenever an image needs to be sized to the window after the page loads. You can turn this off in the Site Identity section of the customizer, but turning it off is not recommended. However, you should be aware that the preloader may cut into the beginning of your video, but this is usually only a trivial amount of time if you have everything set up right.

Questions about Adding a Header Video?

This tutorial was pretty thorough, but I still might have missed something. If there is something else that you need to know, then please post your question in the comments area.

How to Hire a GOOD Web Developer

It can be difficult for a website owner to figure out how to find a good web developer.

Owning a website is similar to owning a home or a car. Sometimes you can take care of it yourself, and sometimes you need to hire a professional. If you own your home, then you can go online and look up how to install a thermostat, then head out to the hardware store and install it yourself. But you can also try to install it yourself then install it wrong, then you have to call a HVAC pro to install it for you anyway.

But finding a reputable web developer is a bit more complicated than finding a licensed HVAC technician. There are a lot of people that advertise themselves as web developers that couldn’t code a “hello world” program if their life depended on it. Anybody can set their job title to web developer. There are no legal requirements.

Researching a Good Web Developer

Before you submit an inquiry to a prospective web developer, check their resume. Do they have an IT background? There will be IT problems. What is their academic background? Do they have a computer science degree? Do they have published software that you can try that people have had success with? Can they help you develop your content (writing, images, etc.)? If something unexpected comes up (which often does), how well will your web developer be able to handle it?

But even if you find someone reputable, how do you know if you are hiring the right developer for the site that you want to build? You want to hire a professional that is familiar with the kind of site that you are trying to build, someone with a design philosophy that appeals to you, and someone that knows how to say no to you when you have a request that is likely to be problematic for your site’s visitors.

Benefits of a Good Web Developer

With so many website building tools available, you may wonder why you should bother hiring a developer at all. The primary benefits of hiring a web developer are speed, quality, performance, the ability to build your site creatively, and you will work with someone that can minimize recurring costs like webhosting fees and software licensing fees.

How Much Does a Good Web Developer Cost?

Hiring a good solo developer will probably cost you at least a couple hundred dollars for a full site. You might be able to negotiate a slightly lower price than this if you think that you can build part of the site yourself. Developers pricing will vary based on the services provided. You can check out my pricing page here. A good solo developer will be able to help you quickly set up a site that is mobile friendly, loads fast, and is tailored to your content. If you don’t have at least a couple hundred dollars in your budget, then you should take the time to learn how to build your site yourself because you will probably do a better job than someone who is willing to work for less than this. If you think that building part of the site yourself is something you can do, but you will need help in certain areas, then talk to a solo developer about your needs, and you should be able to find a suitable solution.

What Kind of Modifications Does a Good Web Developer Make?

Modifications are often things that you can hypothetically do yourself, but you just don’t have the time or patience to figure it out. They are things that don’t have good generalized solutions that can be well built into content management user interface controls. Things such as:

  1. Updating a video so that it fills your entire screen
  2. Adding a typing feature
  3. Creating a custom cover block
  4. Installing a caching system to help your pages load faster

Emailing a Prospective Web Developer

When you submit a query to a web developer stating an interest in their services, you should realize that most developers get a lot of queries that aren’t very serious. And you don’t want to give the impression that you are likely wasting the developer’s time. Most good developers don’t have the ability to serve every prospective client. You need to give the impression that you are serious about what you are doing and that you have put a considerable amount of thought into it.

Below is a list of questions that your prospective web developer will want to know the answers to. You don’t need to answer every question in your query, but you should show that you are not an anonymous person searching for estimates on a site that you aren’t even sure that you want to build yet. Estimates are time consuming, and most good developers don’t want to take the time to write them up if you don’t seem serious. Here are the questions:

  1. What is your legal name? You should not expect someone to provide an estimate for you if you are anonymous. Anonymity implies spam.
  2. What is your legal address? How are you expecting to be held accountable for your bill?
  3. What is the business or service or media that you will be promoting with your website?  How much content do you have? Is this just an idea, or have you actually started taking action?
  4. Will you need any help gathering and writing content?
  5. How soon do you need the site or project completed?
  6. How much money do you have to spend in your budget? Can you afford this?
  7. Do you have any experience building or managing a website? It’s okay if you’ve tried to do it yourself and it didn’t work out.
  8. Do you want to build your site using the developer’s published software? This can save you money.
  9. Do you want any customizations performed on the developer’s published software?  What will they be?  Or are you expecting a site and content management system built from scratch?
  10. How familiar are you with WordPress and the concept of content management?
  11. Will you want customizations performed to your content management controls?  Will you want custom layouts and templates?  What will they be?
  12. How familiar are you with web hosting and servers?
  13. How are you expecting the site to be managed once it’s complete?
  14. What is a phone number that your developer can reach you at so that they can contact you with questions?

It’s important to be able to communicate well with your developer. No mater how good your developer is, if you don’t make it clear what you want, then you won’t get what you want.

Solo Developers Versus Agencies

If you can find a solo developer that shares your design interests, then that will usually be a preferable choice over an agency. Most agencies have a requirement to churn through a certain number of clients in a given period to make their overhead, and because they have so many people working in different specialties, they often struggle with a lot of communication related problems that can result in their clients getting a site that is distinct from the one that they requested.

Agencies usually also tend to cost significantly more than solo developers. You can often get a site from a solo developer for hundreds of dollars that would cost thousands of dollars with an agency.

Hiring an agency is usually only preferable when you can’t find a solo developer that has an appealing web design philosophy. Solo developers tend to provide a smaller range of customization options than agencies, but solo developers also tend to be a lot better at the customization range that they perform, and they can usually do it cheaper and faster because they are more familiar with their specific development processes, and they don’t have the overhead of agencies.

Are You Ready to Hire Someone?

It’s okay if you’re still not ready to pull the trigger today. Take your time. Do your own research. And feel free to post any questions in the comments section.

But if you are ready to hire a pro, then check out my services, and see if they are right for you.